Use case walkthrough
Free & ProRun an instructor marketplace with Learnomy
You run a platform, not a single course catalog. Outside instructors apply to teach, you approve who gets in, and every sale splits between the instructor and the platform. You need a queue for applications, a way for instructors to build and publish without touching wp-admin, a commission split you control, a way to pay instructors out, and a light moderation layer so reviews and comments stay usable as the number of instructors and students grows. This guide does not cover building a single course end to end; see Solo Creator Academy for the course builder and pricing walkthrough, then come back here for what changes once more than one person is teaching on your site.
What you'll use
Instructor applications
Becoming an Instructor →Managing instructors
Managing Instructors →Course approval workflow
Course Approval Workflow →Commissions and earnings
Commissions and Earnings →Manual withdrawal requests
Commissions and Earnings →Stripe Connect payouts
Stripe Connect Payouts →Frontend course builder
Frontend Course Builder →AI authoring
AI Authoring →Course reviews
Course Reviews →Content moderation (report / block)
Content Moderation →Course building basics
Solo Creator Academy →The walkthrough
Phase 1 - Open the marketplace to instructors
Decide how people become instructors on your site.
Your options here:
- Open applications - anyone with a WordPress account fills out the
form at
/become-instructor/, describing their background, expertise, and first course idea. You review each submission and approve or reject it from a queue. Pick this when you want a public call for instructors and are prepared to screen applicants. - Invite directly - go to Users > Add New (or edit an existing
user) and set their Role to Instructor. This skips the
application form entirely and grants the
lrn_instructorrole immediately. Pick this when you already know who you want teaching, for example a corporate training partner or a handpicked subject expert, and don't want to run a public call.
A marketplace with many outside instructors typically runs open applications as the default path, with direct invites reserved for partners you bring on yourself. See Becoming an Instructor.
- Open applications - anyone with a WordPress account fills out the
form at
Go to Learnomy > Applications. The queue opens on the Pending tab, with Approved and Rejected tabs alongside it, each showing a row count.
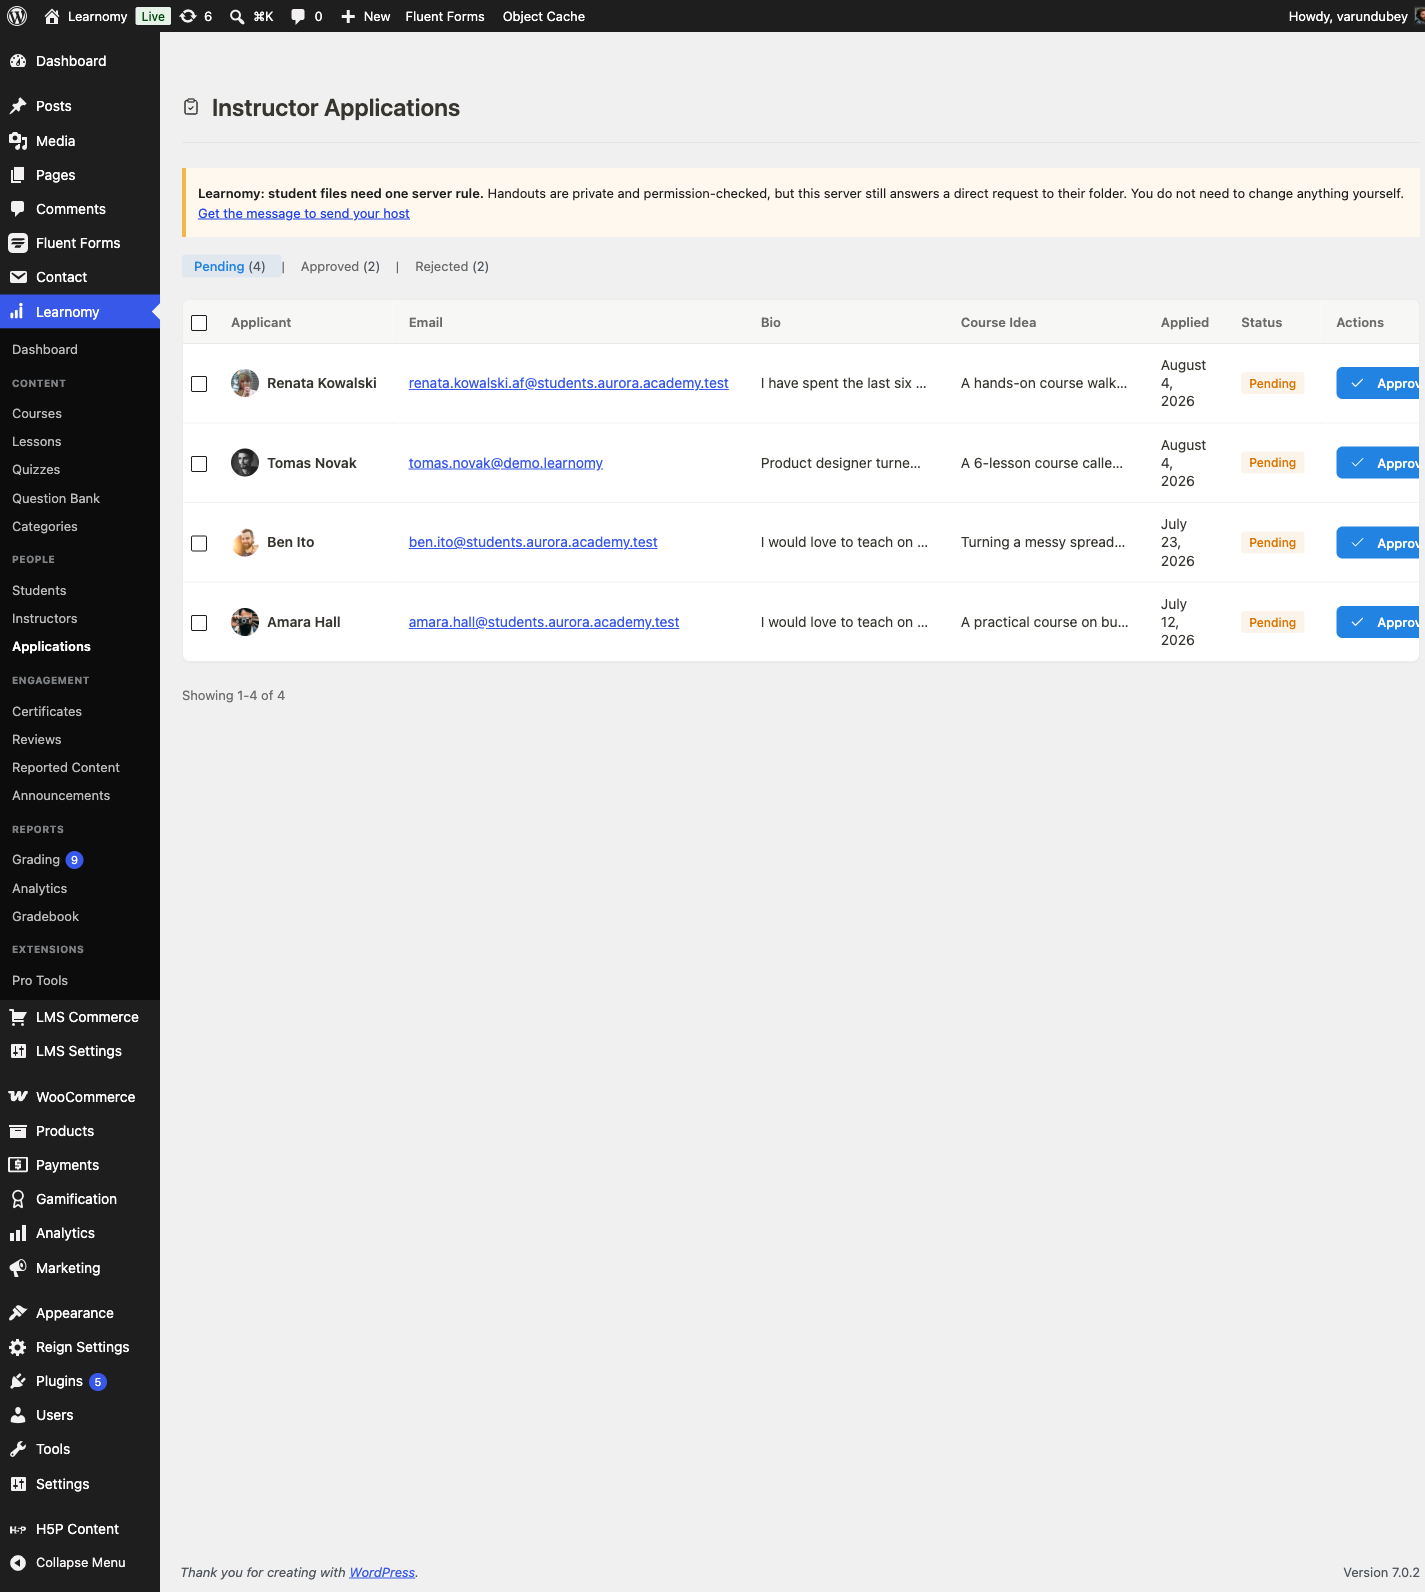
Instructor Applications queue with four pending rows Click an applicant's name to read their full bio, areas of expertise, teaching experience, course idea, and preferred payout method before you decide. From the queue itself, use the row actions:
- Approve - confirm the prompt. The applicant's role upgrades to
lrn_instructorimmediately, the application moves to the Approved tab, and they receive a notification email. - Reject - confirm the prompt, optionally with a reason. The
application moves to Rejected; the applicant can revise their
details and reapply from
/become-instructor/.
Once you have more than a couple of instructors, decide whether they can publish their own courses without a look from you first, or whether every course needs your approval before it goes live. This is a separate, site-wide toggle (LMS Settings > Settings > Instructors, with a per-instructor override on the instructor's detail page) and does not change anything about the application queue itself. See Course Approval Workflow.
- Approve - confirm the prompt. The applicant's role upgrades to
Phase 2 - Let instructors build
Decide how instructors create and edit their courses.
Your options here:
- wp-admin editors (Free) - an approved instructor logs into wp-admin and uses Learnomy > Courses > Add New, the same course builder covered in Solo Creator Academy, Phase 1. Pick this when your instructors are comfortable in wp-admin or you run a small, trusted roster.
- Frontend course builder (Pro) - instructors never see wp-admin.
They build at
/instructor/create-course/, a four-step wizard, and keep editing at/instructor/edit-course/{id}/afterward. Pick this for a marketplace with many outside instructors who should not need a wp-admin login at all. - AI-assisted draft-first (Pro, off by default) - instructors (and admins) generate a starting curriculum or quiz questions with AI, then review and edit before publishing. Nothing is ever published automatically; every AI-generated section, lesson, or question is created as a draft. Pick this to speed up an instructor's first draft, on top of either authoring path above, not instead of it.
A marketplace usually gives instructors the frontend builder as their default authoring path, since it is the option that needs no wp-admin access, and turns AI-assisted drafting on for instructors who want a faster start.
On the frontend builder, an instructor with the
lrn_instructorrole opens/instructor/create-course/and works through four steps: Course Info (title, a rich-text description, category, thumbnail, access type, and difficulty level), Curriculum (add sections, lessons inside them, and loose lessons, with drag-and-drop reordering), Settings (completion requirement and an estimated duration; certificate template, prerequisites, tags, drip schedule, and co-instructors are all set afterward in the editor), and Review & Publish. Save Draft in the header saves progress at any point without publishing.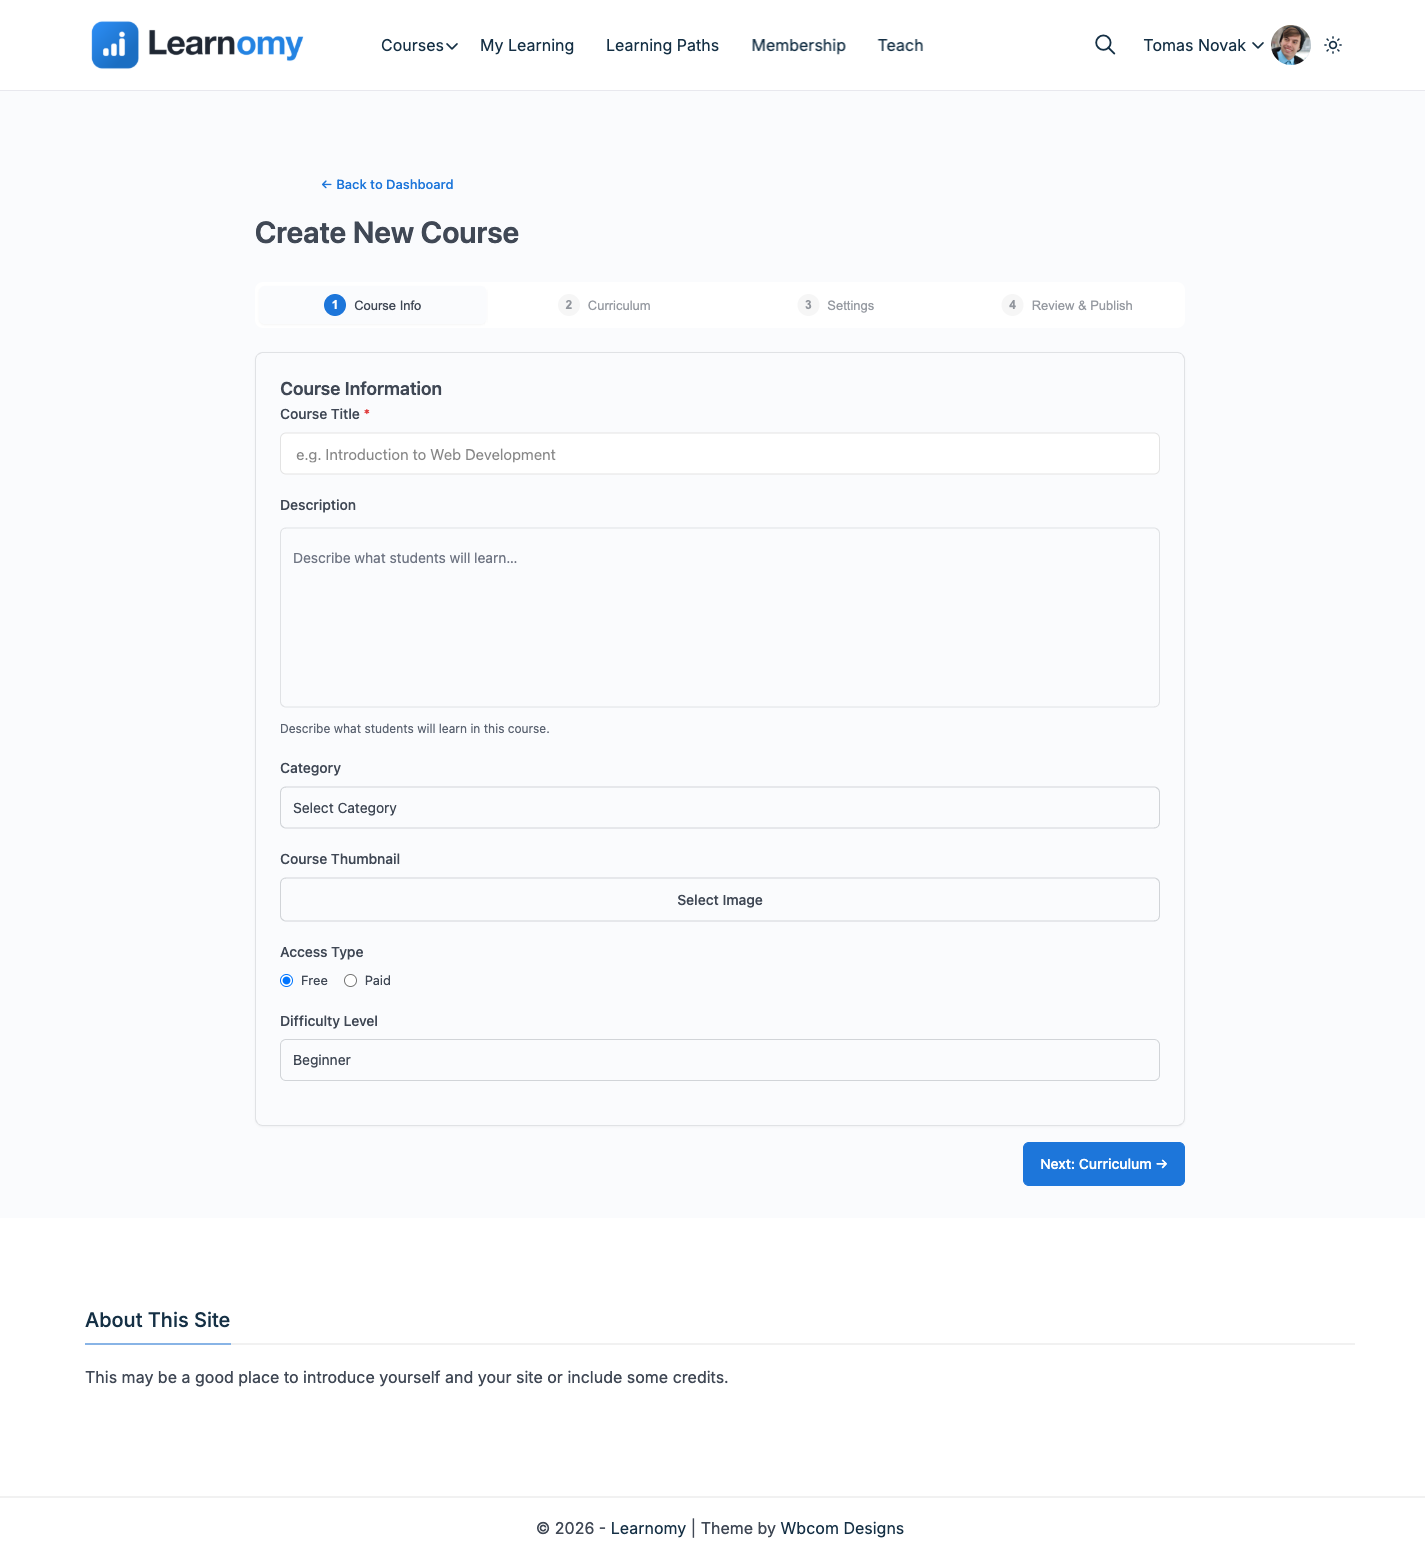
Frontend course builder, Course Info step, as a newly approved instructor See Frontend Course Builder for what the persistent editor covers after the course is created, including co-instructors and content drip.
To turn on AI authoring, go to Learnomy > Settings > AI authoring. Check Enable AI authoring, tick Instructors under Who can use it if you want instructors (not just admins) generating content, and leave Draft-first on. Click Save Changes.
AI authoring runs on the AI provider you connect once in WordPress core under Settings > Connectors; Learnomy never stores the key itself. The AI connection card at the top of this tab shows whether a provider is connected.
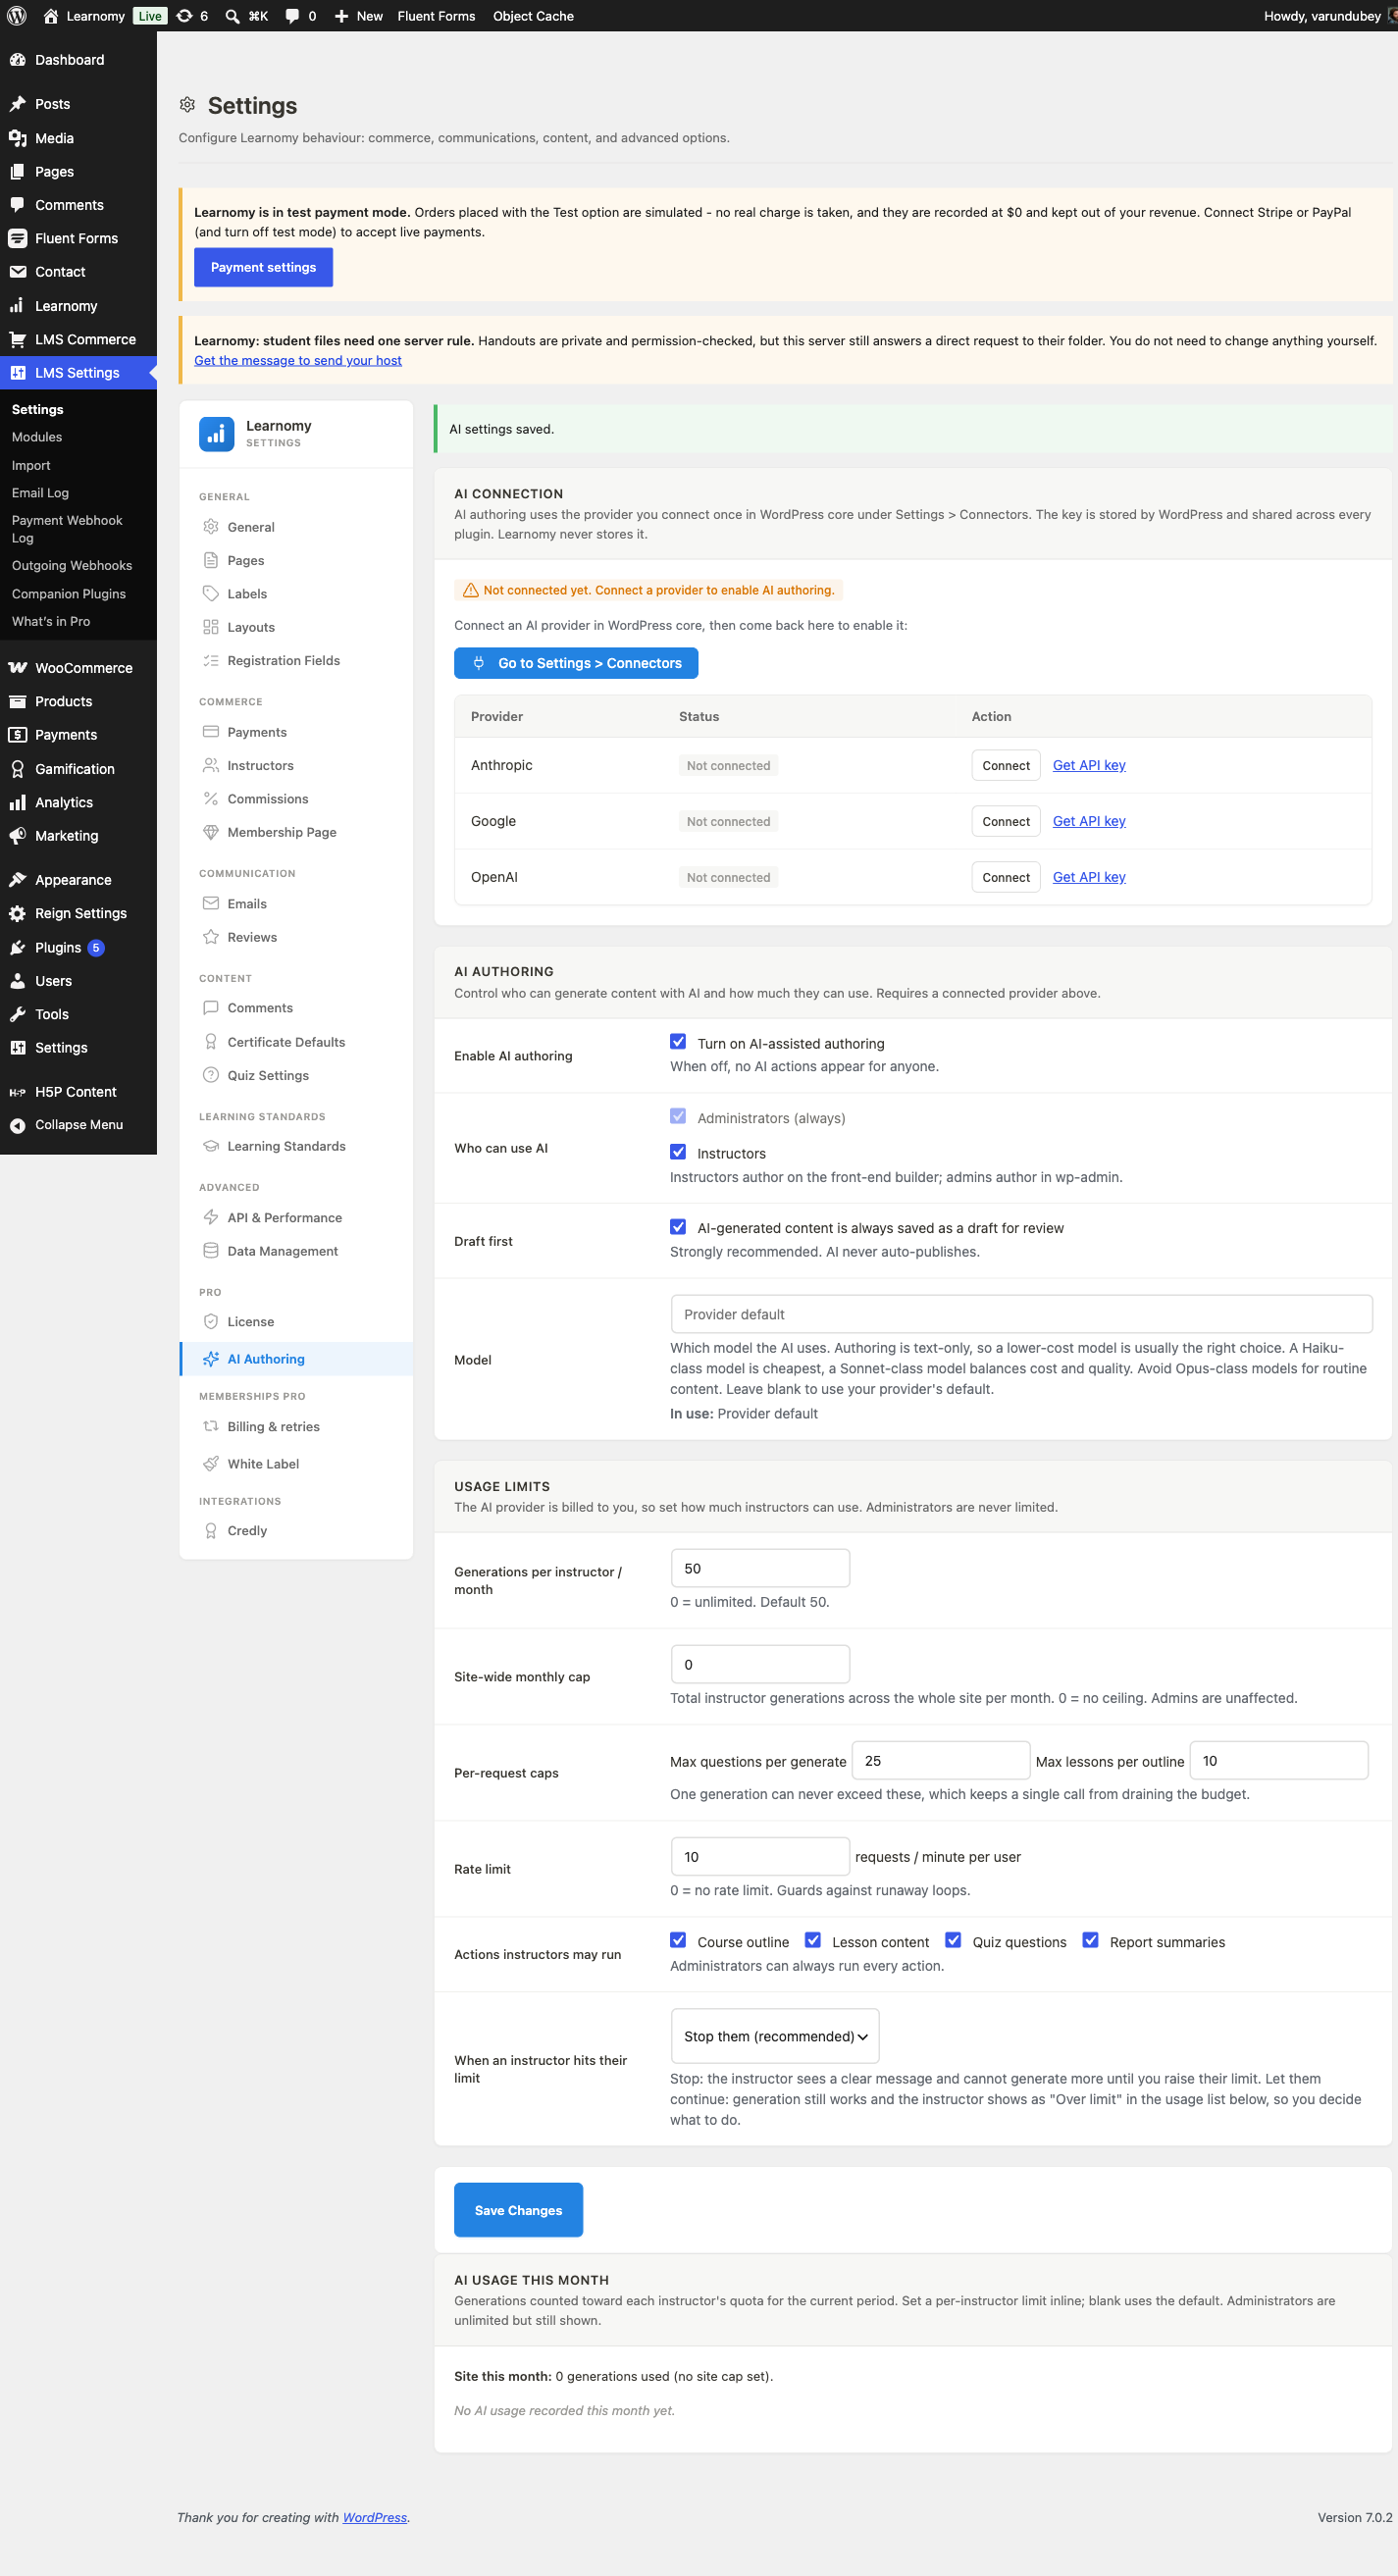
AI authoring settings enabled, with the AI connection card reading Not connected yet On the model site used for this guide, no AI provider is connected under Settings > Connectors, so the connection card reads Not connected yet and the Generate with AI entry points do not appear in either builder until a provider is added. With a provider connected, the flow (per AI Authoring) is: open the Curriculum step of either course builder, click Generate with AI, describe the course and click Suggest an outline, review the proposed sections, then click Generate draft curriculum to create each section and lesson as a draft you edit and publish yourself. Quiz questions follow the same suggest-then-add pattern from the quiz editor. Nothing AI creates is ever published automatically.
Phase 3 - Pay your instructors
Set your default commission split. Go to LMS Settings, open the Commissions section, and enter your Platform Commission (%). The instructor's share is the remainder; the site-wide default is 30% platform / 70% instructor.
Go to LMS Commerce > Earnings to add per-course or per-instructor overrides on top of the default split.
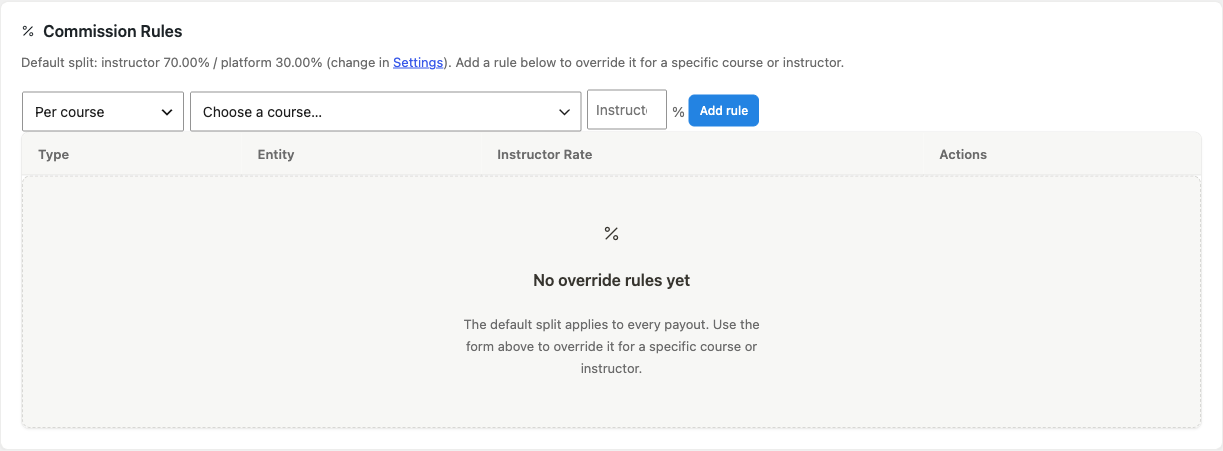
Commission Rules card showing the default 70/30 split and the override form In the Commission Rules card, choose Per course (Free) or Per instructor (Pro) from the rule-type dropdown, pick the course or instructor, enter the rate, and click Add rule. A per-course rule wins over a per-instructor rule, which wins over the site default. See Commissions and Earnings.
On the instructor's own dashboard at
/instructor/earnings/, the Earnings widget shows Available to Withdraw, This Month, and Lifetime, plus a 30-day revenue trend.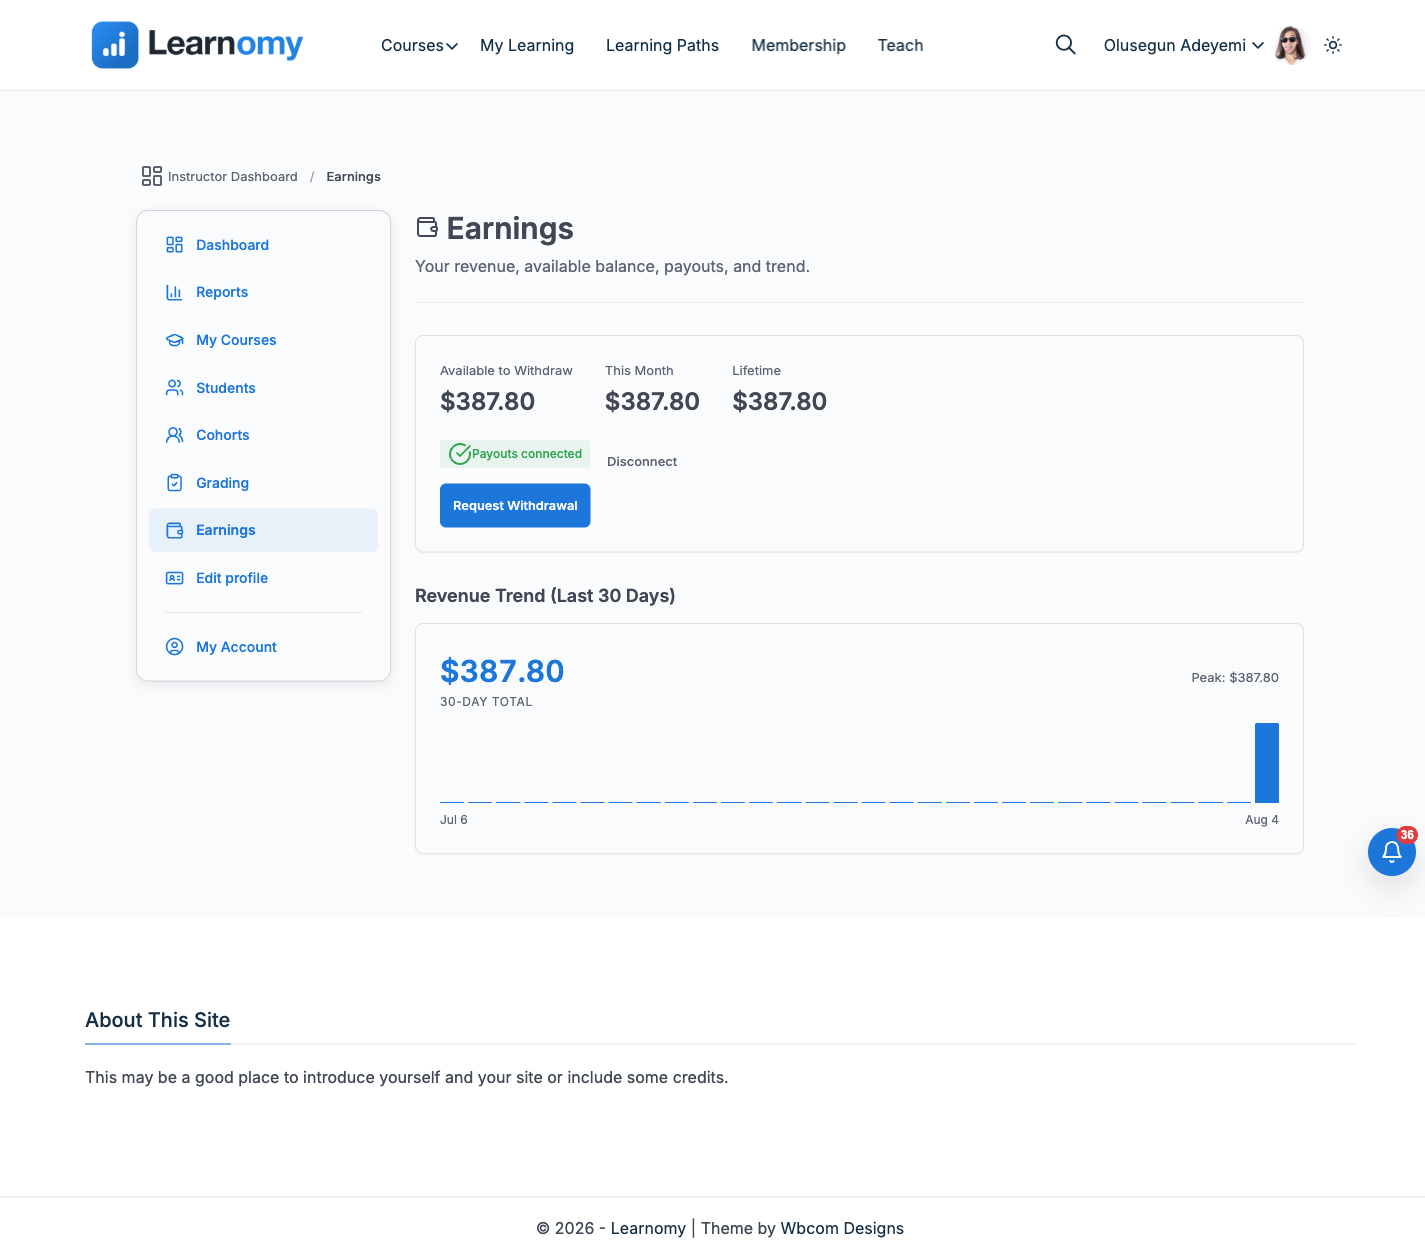
Instructor Earnings page with Available to Withdraw, This Month, and Lifetime figures Decide how instructors get paid.
Your options here:
Manual withdrawal requests (Free, default) - the instructor clicks Request Withdrawal, enters an amount (a site-configurable minimum applies, $25 by default) and a payout method (PayPal, Bank transfer, Stripe, or Other, arranged by email), and submits. The request lands in your Withdrawal Requests queue as Pending. You approve it there once you have actually sent the money by whatever means you use outside Learnomy; approving is a recording step, not a funds transfer. This needs zero integrations: you can run an entire instructor marketplace and pay every instructor by hand from day one.
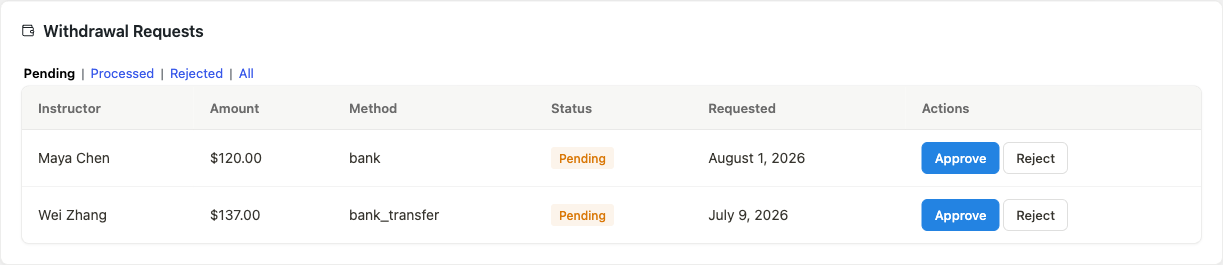
Withdrawal Requests queue in LMS Commerce > Earnings, two pending rows shown - captured before Olusegun Adeyemi's request below brought the queue to three Stripe Connect automated payouts (Pro, opt-in) - each instructor completes Stripe's onboarding once from their dashboard; Learnomy then transfers their commissions directly to their own connected Stripe account. You still decide when transfers run: click Process Payouts yourself whenever you want, or additionally check Run payouts automatically on the schedule to have Learnomy run the same process on a cadence (weekly, every two weeks, or monthly) that you set. Stripe Connect never fires on its own until you turn that schedule on; the trigger is yours either way.
Start every marketplace on manual withdrawal requests, since it works with no setup and keeps you in control of every payout. Turn on Stripe Connect once the volume of instructors and payouts makes manual approval a bottleneck, and even then, decide deliberately whether to run it on a schedule or keep triggering it by hand.
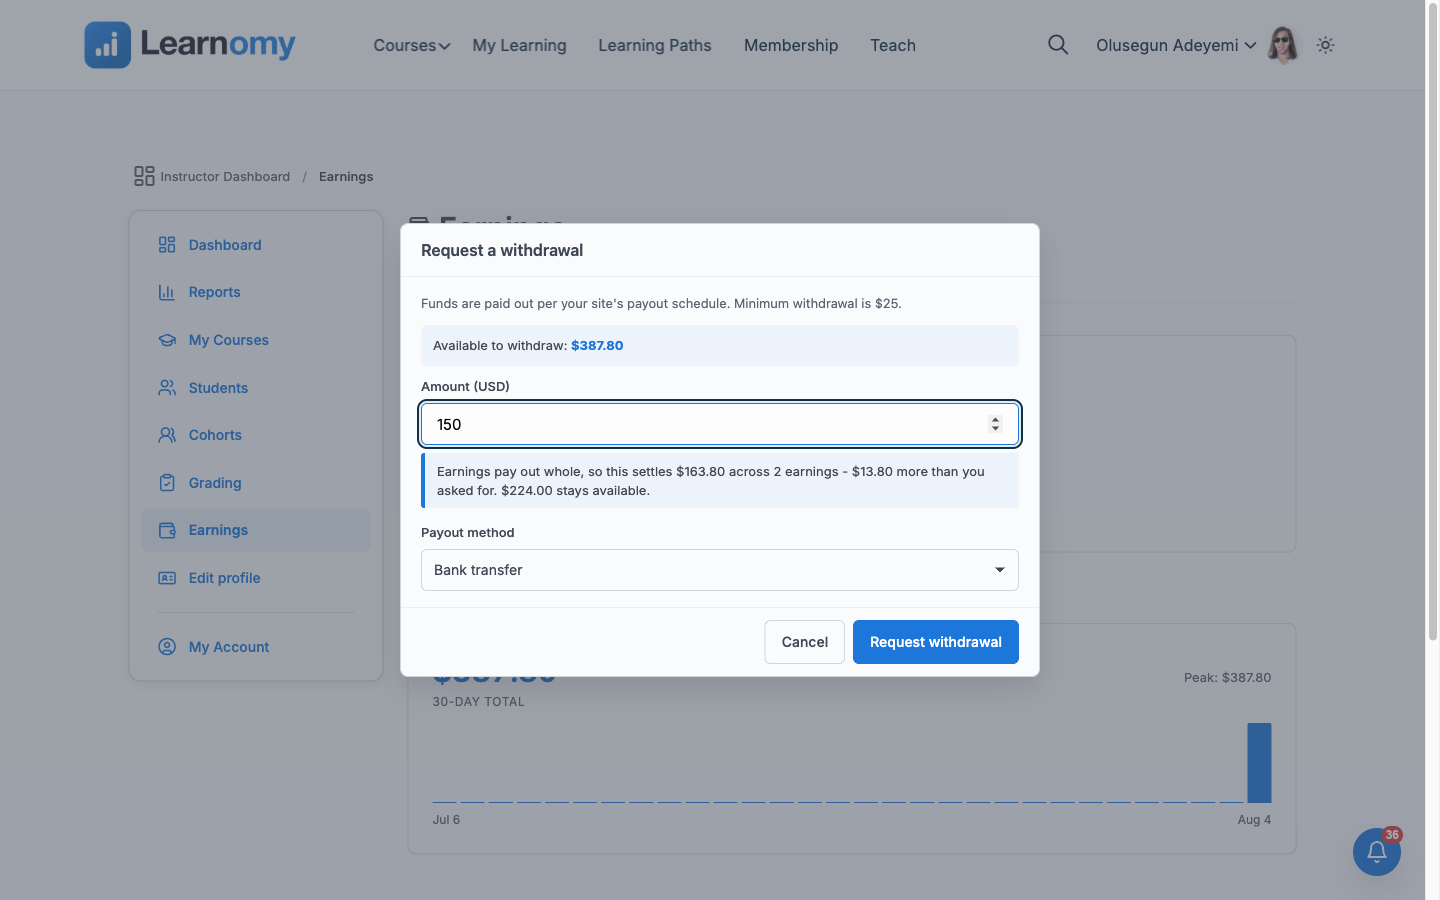
Request a withdrawal dialog, filled in with amount and payout method If you turn on Stripe Connect, go to LMS Commerce > Stripe Payouts and fill in the Connect Settings card: your Stripe secret and publishable keys, your Connect client ID, a Payout schedule, and a Minimum payout amount. The page also shows a live summary (pending, total paid, failed, and connected-instructor counts), a payouts table you can filter by status, and an Outstanding Refund Debts panel for payouts a refund could not fully claw back.
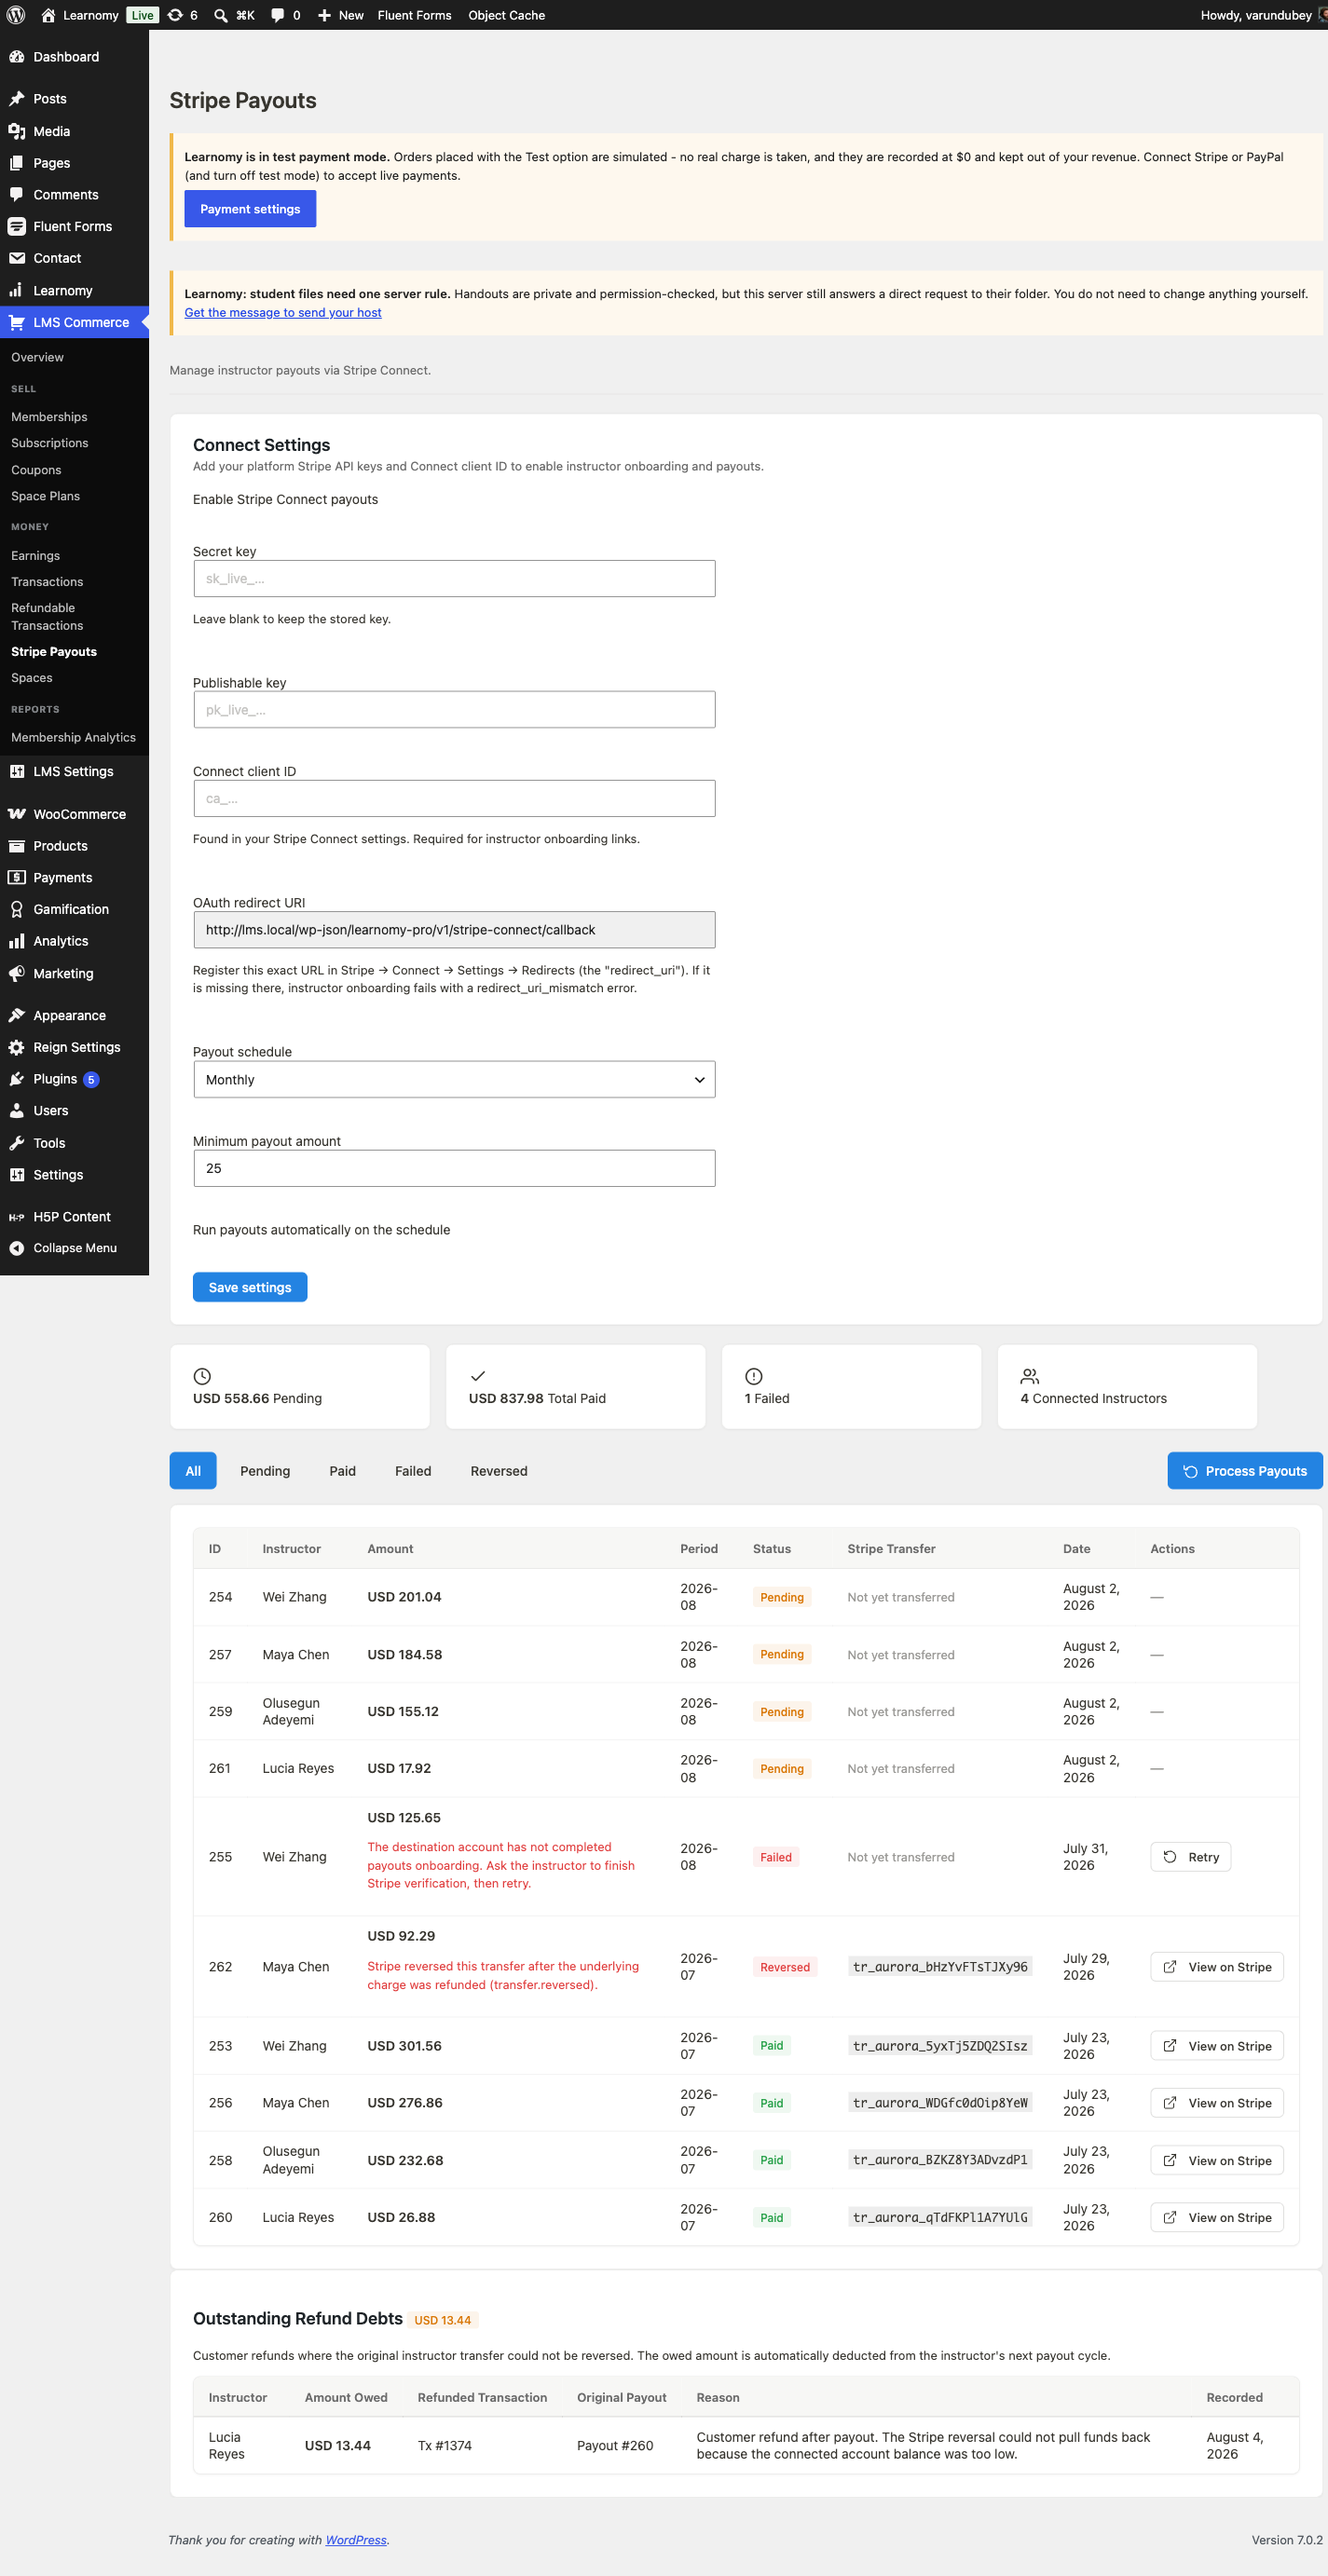
Stripe Payouts page with paid, pending, and failed rows across four connected instructors A failed transfer shows its Stripe error inline; click Retry once the underlying issue (usually incomplete Stripe onboarding) is fixed. See Stripe Connect Payouts.
Phase 4 - Keep it safe as it grows
Decide how course reviews are moderated. Go to LMS Settings > Reviews.
Your options here:
- Moderate every review (default) - leave Auto-Approve unchecked. New reviews land on the Pending tab at Learnomy > Reviews and you approve, reject, mark as spam, or delete each one before it appears publicly.
- Auto-approve reviews - check Auto-Approve. Reviews go live immediately without a moderation step; you still see them all at Learnomy > Reviews and can reject or remove one after the fact.
A marketplace with many instructors and a growing review volume typically starts with moderation on, then switches to auto-approve once the review volume makes pre-approval impractical, relying on reports (below) to catch problems after the fact. See Course Reviews.
Any logged-in member can report a review, a lesson comment, or a course itself. On a review, a Report button sits next to Block; on a course page, a Report this course button appears near the bottom of the page. Reporting asks for an optional reason, then submits.
Go to Learnomy > Reported Content to review what members have flagged. Filter by All, Open, Dismissed, or Actioned.
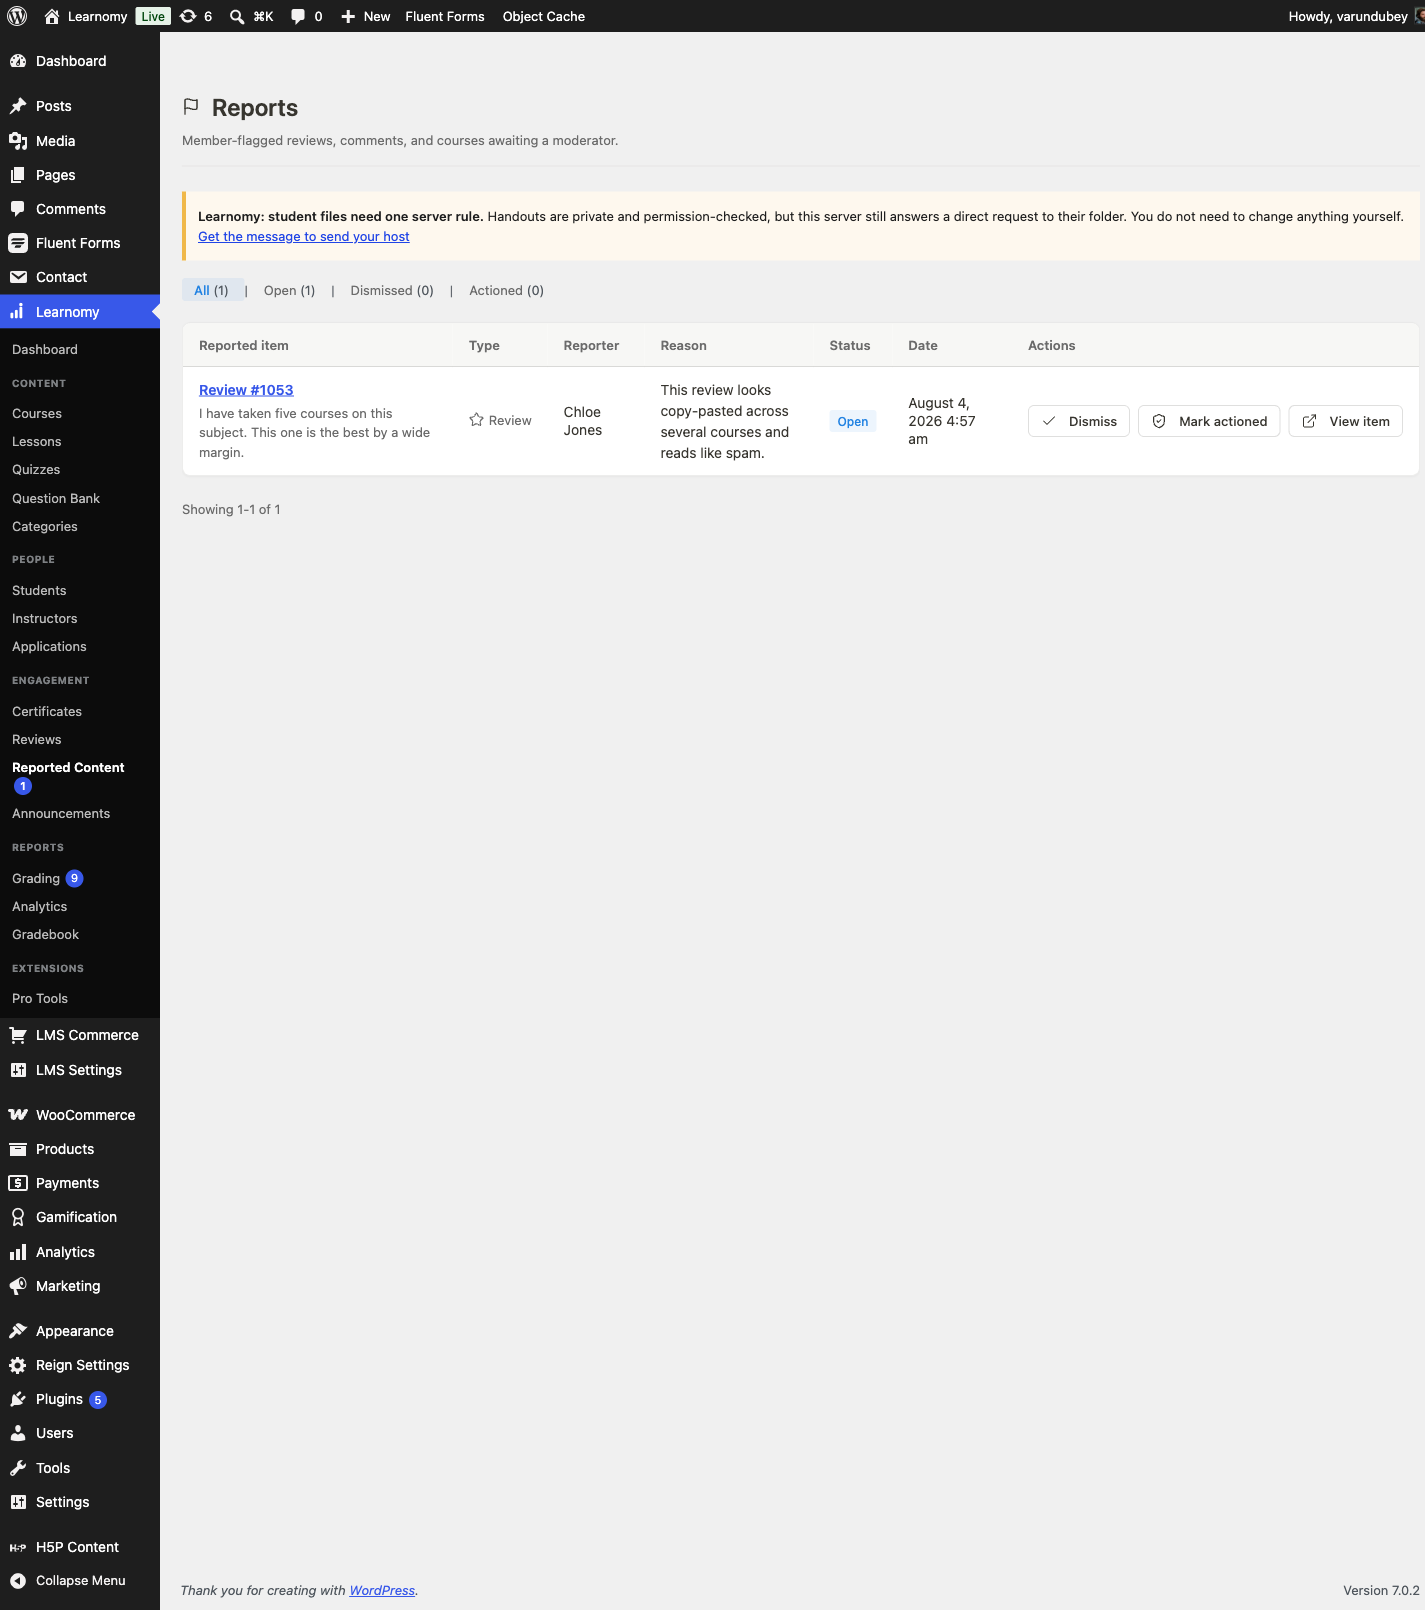
Reported Content queue with one open report against a course review For an open report, click View item to inspect (and edit or remove) the reported review, comment, or course, then use the row action to Dismiss it (nothing was wrong) or Mark actioned (you handled it). This is a report-driven queue, not an automated keyword filter: nothing is hidden automatically just because it was reported. See Content Moderation.
Verify it works
- Go to Learnomy > Applications, confirm the Pending tab, and click Approve on a pending row. Confirm the prompt.
- Log in as the newly approved instructor. Open
/instructor/and confirm the instructor dashboard loads. - Open
/instructor/create-course/and confirm the four-step frontend builder loads with the Course Info step active, proving the new instructor can author without a wp-admin login. - Since the Applications queue has no "return to pending" action for an
approved row, restore the seeded state directly: set that application's
status back to
pending(clearing the reviewer and review date) and remove thelrn_instructorrole from the account, returning it to whatever role it held before.
On the model site this was exercised end to end. Application #168 (Tomas
Novak, lrn_demo_tomas, a pending application for "Intro to Figma for
Founders") was approved from the queue, which upgraded his account to
lrn_instructor immediately. Logged in as a test account, the
instructor dashboard at /instructor/ loaded, and /instructor/create-course/
loaded the four-step wizard with Course Info active, confirming a
freshly approved instructor reaches both surfaces with no wp-admin access.
The application was then restored: status set back to pending (reviewer
and review date cleared) and the lrn_instructor role removed, returning
the account to its original subscriber role. The Applications queue
now reads Pending (4), Approved (2), Rejected (2), exactly
matching the state before this walkthrough, and no course was ever saved
under the account.
Keep reading
Build this on your own site
Everything above runs on your WordPress server. Start with the free plugin; add Pro when a step here needs it.