Use case walkthrough
Free plugin onlyRun a solo creator academy with Learnomy
You are an individual expert launching a paid course under your own name. You write the curriculum, set one price, sell it directly from your own site, and want a certificate the student can show once they finish. You do not run an instructor marketplace and you do not split revenue with anyone else.
What you'll use
Solo Academy mode
Solo Academy Mode →Course builder
Creating a Course →Sections and lessons
Sections and Lessons →Lesson content types
Lesson Content Types →Pricing and access models
Pricing and Access Models →Stripe checkout
Payment Gateways →Coupons
Coupons →Per-course SEO
Course SEO and Sharing →Certificates
Certificates →The walkthrough
Phase 1 - Set up
Go to LMS Settings > Settings and open the Academy Mode card. Turn on I am the only instructor (solo mode) and click Save Changes. This hides the instructor application page, the commission and earnings screens, and the admin Instructors and Applications menus, since none of them apply when you are the only person teaching. See Solo Academy Mode.
Go to Learnomy > Courses > Add New and fill in the course title, description, and thumbnail.
Open Manage Curriculum and build the course: Add Section, then Add Lesson inside it for each piece of content. Every lesson carries a content type:
Your options here:
- Text - a written lesson. The default, and the right choice for most lessons.
- Video - a hosted or embedded video player. See Embedding Video and External Content.
- Audio - an inline audio player, for a podcast-style lesson.
- PDF - a document shown inline, with an "Open in a new tab" fallback.
- Download - a single button that downloads a file such as a worksheet or template.
- Embed - a pasted link from YouTube, Vimeo, or another oEmbed or PeerTube provider, rendered as a clean inline player.
- Live - a scheduled session that links out to Zoom, Google Meet, or Teams, with its own three fields: a Join link, a Starts at time, and how long the session Runs for in minutes. Pick this when part of your curriculum happens on a live call rather than as pre-recorded content, for example an office-hours session or a live Q&A. The cohort coaching guide covers live sessions in depth.
A one-course creator typically mixes Text for the bulk of the curriculum with a handful of Video lessons for demonstrations and a Download lesson for a worksheet or template. See Lesson Content Types.
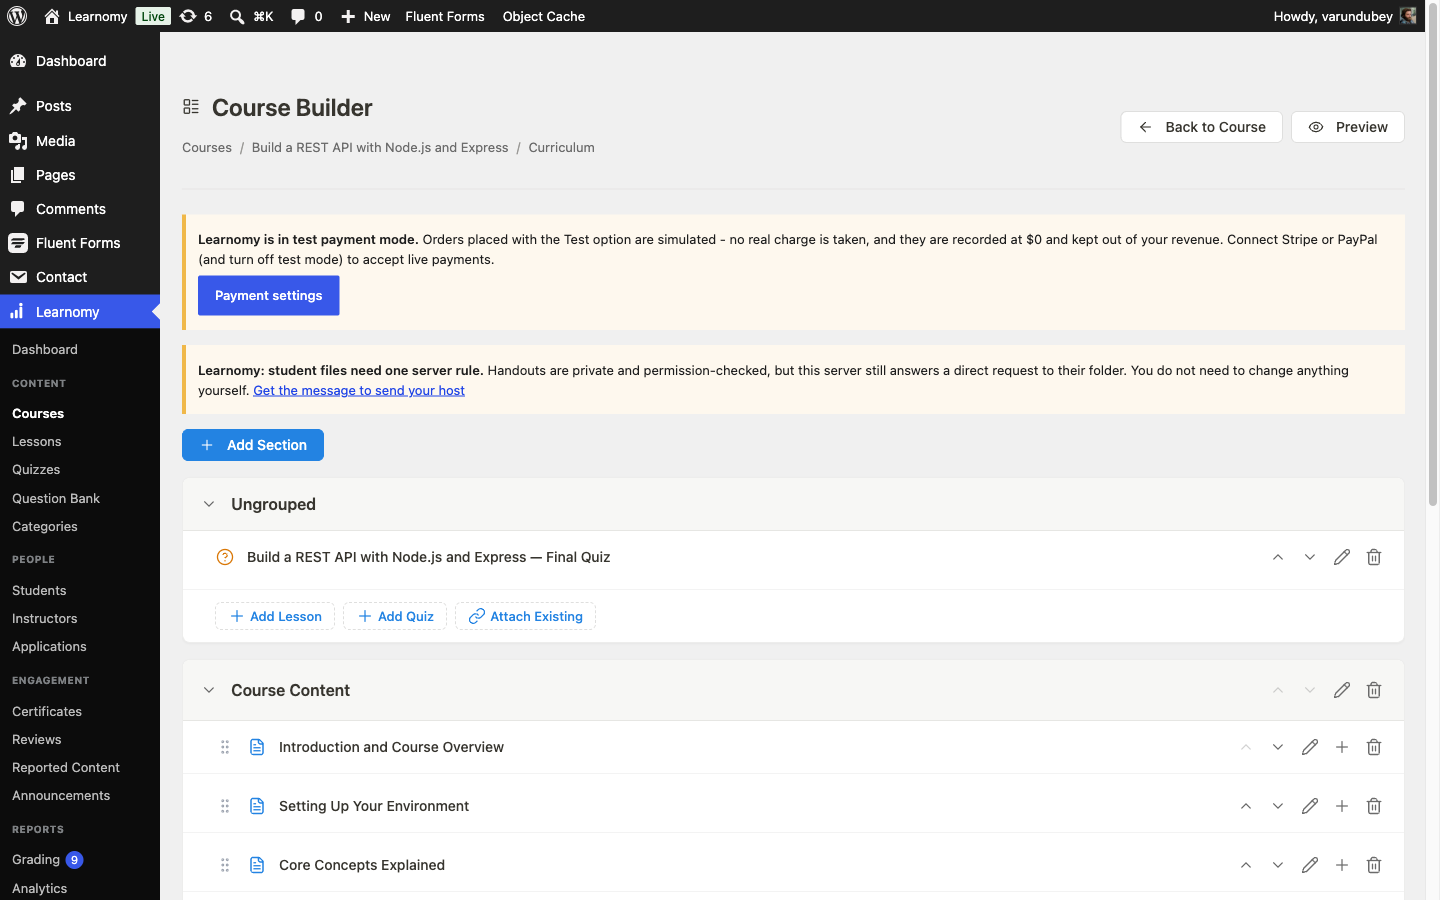
Course builder curriculum tree
Phase 2 - Price it, take payment, and get found
Open the course editor's Pricing & Access section. Learnomy supports eight pricing models:
Your options here:
- Free - anyone signed in enrolls with no payment.
- One-time payment (lifetime access) - pay once, keep access forever.
- One-time payment (time-limited access) - access lasts a set number of days, then a Renew button appears.
- Recurring subscription - the student pays every month or year.
- Members only - reachable only through an active membership plan.
- One-time payment OR Members - buy outright, or reach it through membership.
- Invite only (you add the students) - nothing is shown for sale; you add students yourself.
- Access granted externally (no on-site checkout) - sold somewhere else, with an optional link to where.
For a solo creator selling a first course, pick One-time payment (lifetime access). It needs no subscription billing to manage and no membership catalog to build first, and it matches how a single course is usually sold. Set the Regular price, and add a Sale price with a start and end date if you want a limited-time launch discount instead of a permanent coupon. See Pricing and Access Models.
Once a course has a paying customer, Learnomy locks the pricing model so existing buyers are never left in a half-priced or half-membership state. To relaunch with different pricing, clone the course instead of editing the live one.
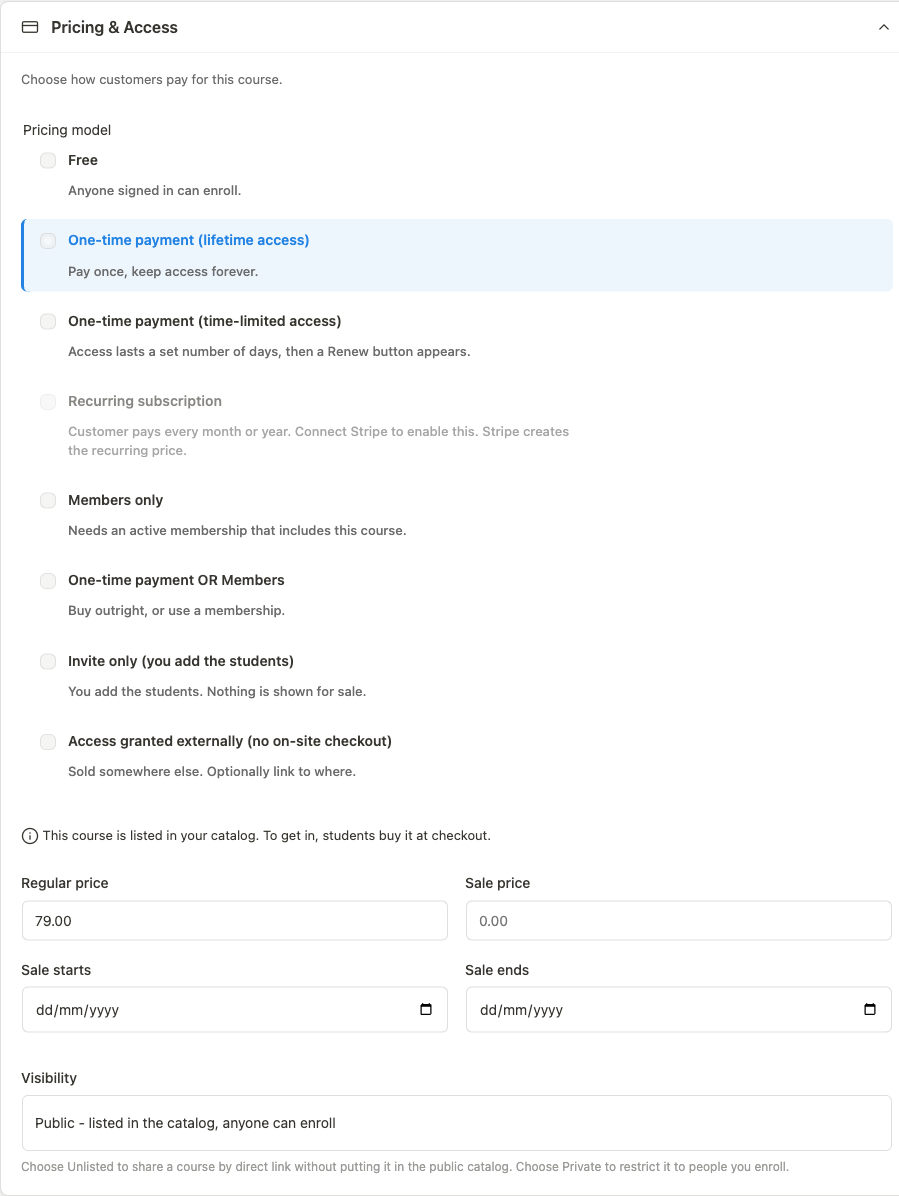
Pricing model selector showing all eight options Go to LMS Settings > Settings > Payments and choose a gateway. Learnomy offers four:
Your options here:
- Test - a synchronous in-memory gateway that completes every checkout without hitting an external service. Free, no setup, and clearly labeled DEVELOPMENT ONLY.
- Stripe - on-page card checkout with Stripe's Payment Element, plus support for delayed bank methods (SEPA, boleto, Konbini, and others).
- PayPal - a second real-money option alongside or instead of Stripe.
- WooCommerce - routes Learnomy purchases through the WooCommerce cart and checkout instead of Learnomy's own payment page, useful if you already run a WooCommerce store.
Build and test your course with the Test gateway enabled, then switch to Stripe (or add PayPal alongside it) before launch. Enter your Stripe API keys, set Mode to Live, and copy the webhook URL into your Stripe Dashboard so delayed payment methods and refunds stay in sync. See Payment Gateways.
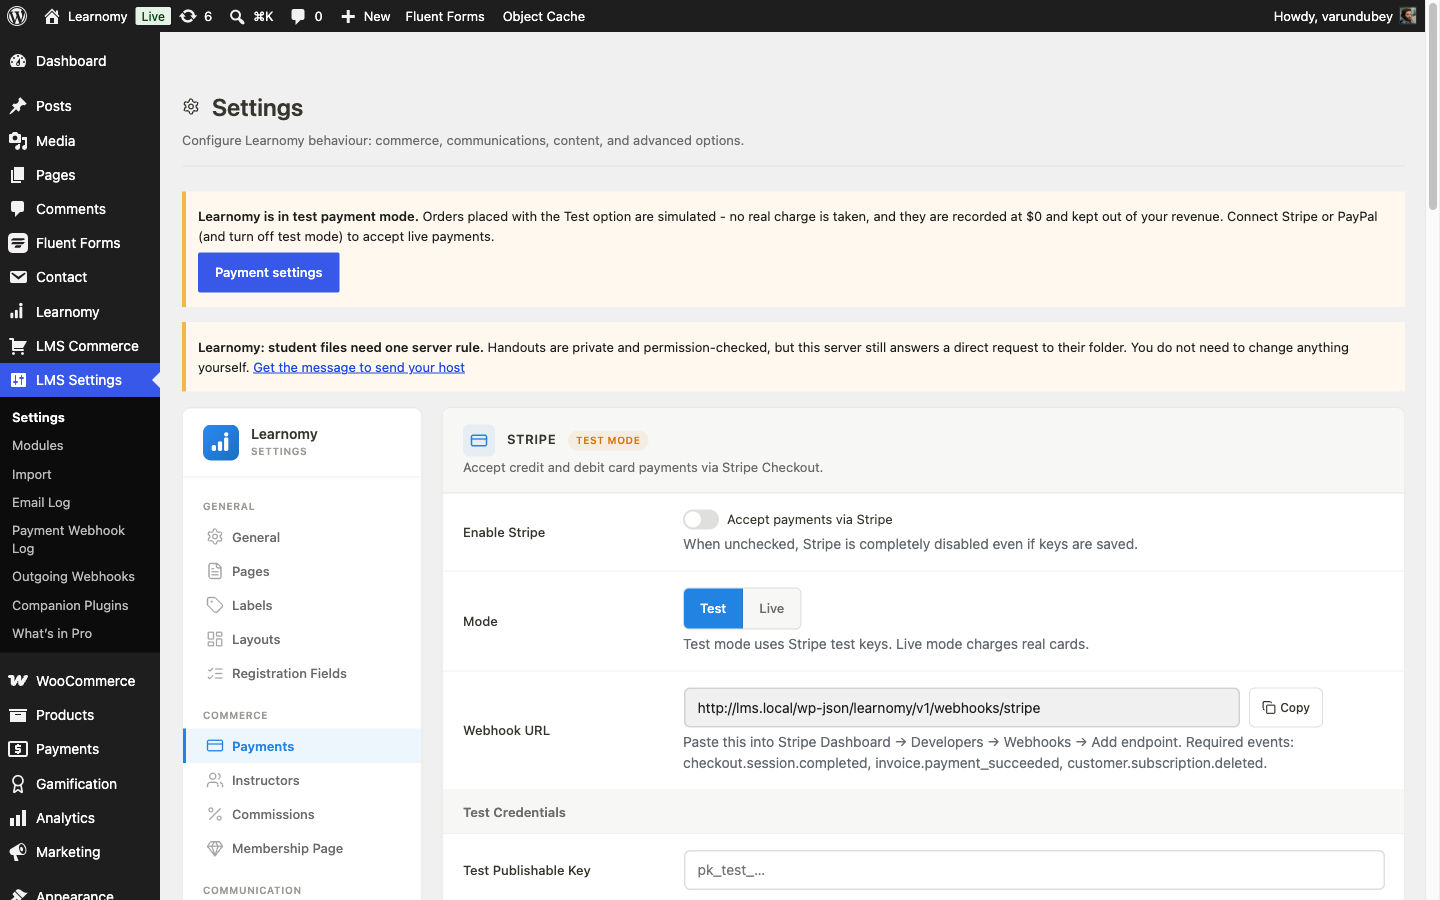
Stripe gateway settings card Go to LMS Commerce > Coupons to create a launch discount. Set a Code, a Discount Type and Value, use Restrict to specific courses to scope it to this course only rather than your whole catalog, and set an Expiry Date a few weeks out. A blank Expiry Date currently stores as an already-expired date and the coupon is rejected at checkout, so always pick a future date until that is fixed. See Coupons.
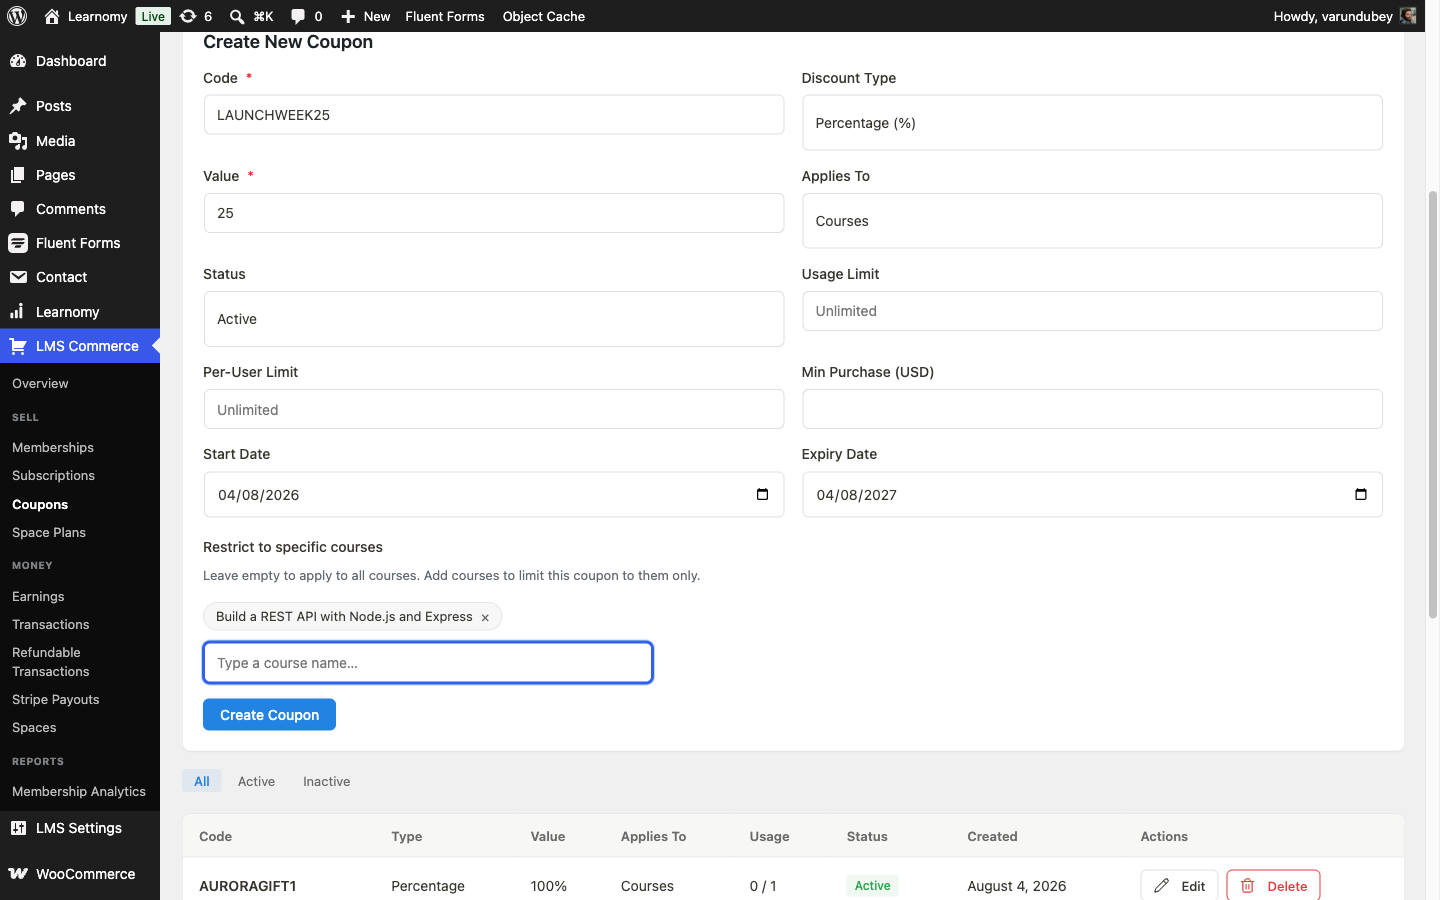
Coupon creation form Back in the course editor, open Search & Sharing and fill in a Search title and Search description written for search results and shared links, rather than relying on the course title and the start of the description. See Course SEO and Sharing.
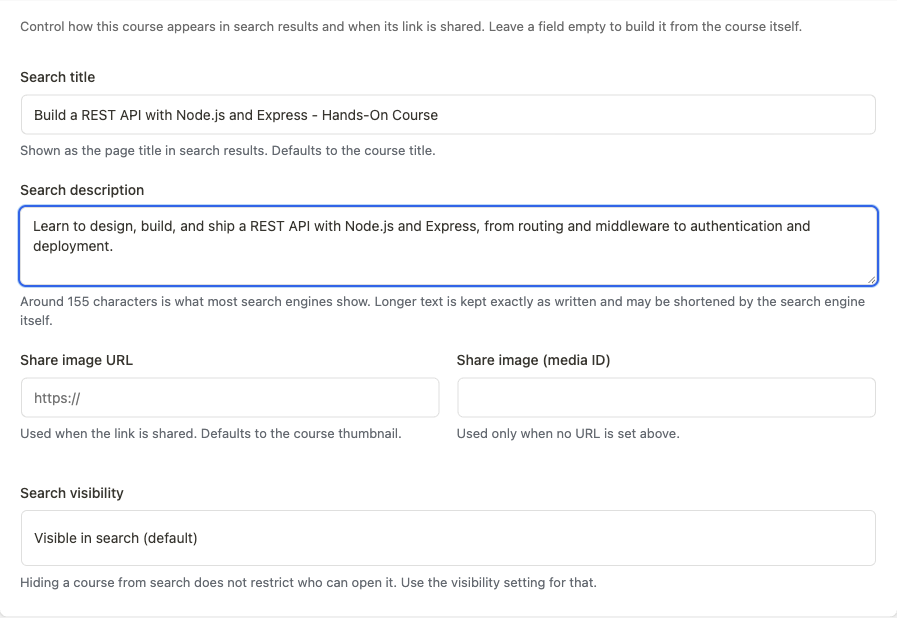
SEO override fields on the course editor Open Completion & Certificate in the same course editor. Set a Completion Requirement, then decide on a certificate:
Your options here:
- Award a certificate on completion - Learnomy issues a signed, verifiable certificate automatically the moment the student meets the completion requirement. Pick a Certificate Template.
- No certificate - leave the checkbox off. Nothing is issued.
A paid course sold under your own name is exactly where a certificate earns its keep: it is proof of finishing that the student can show an employer or share on LinkedIn, and it costs you nothing extra to turn on. See Certificates.
Phase 3 - Test it as a student
Log out, then log back in as a student account that has not bought the course. Open the course page, enter the coupon code if you made one, and click Buy Now. That coupon field only shows up on Learnomy's own checkout: with WooCommerce enabled as the gateway (this model site's default), Buy Now routes straight to the WooCommerce cart instead, where the Learnomy coupon field never appears -- turn the WooCommerce gateway off, or see Add courses to your WooCommerce store for how the two interact.
On the checkout page, confirm Test Payment is selected and click Complete Test Purchase. No card is charged; Learnomy records the order and enrolls the student immediately.
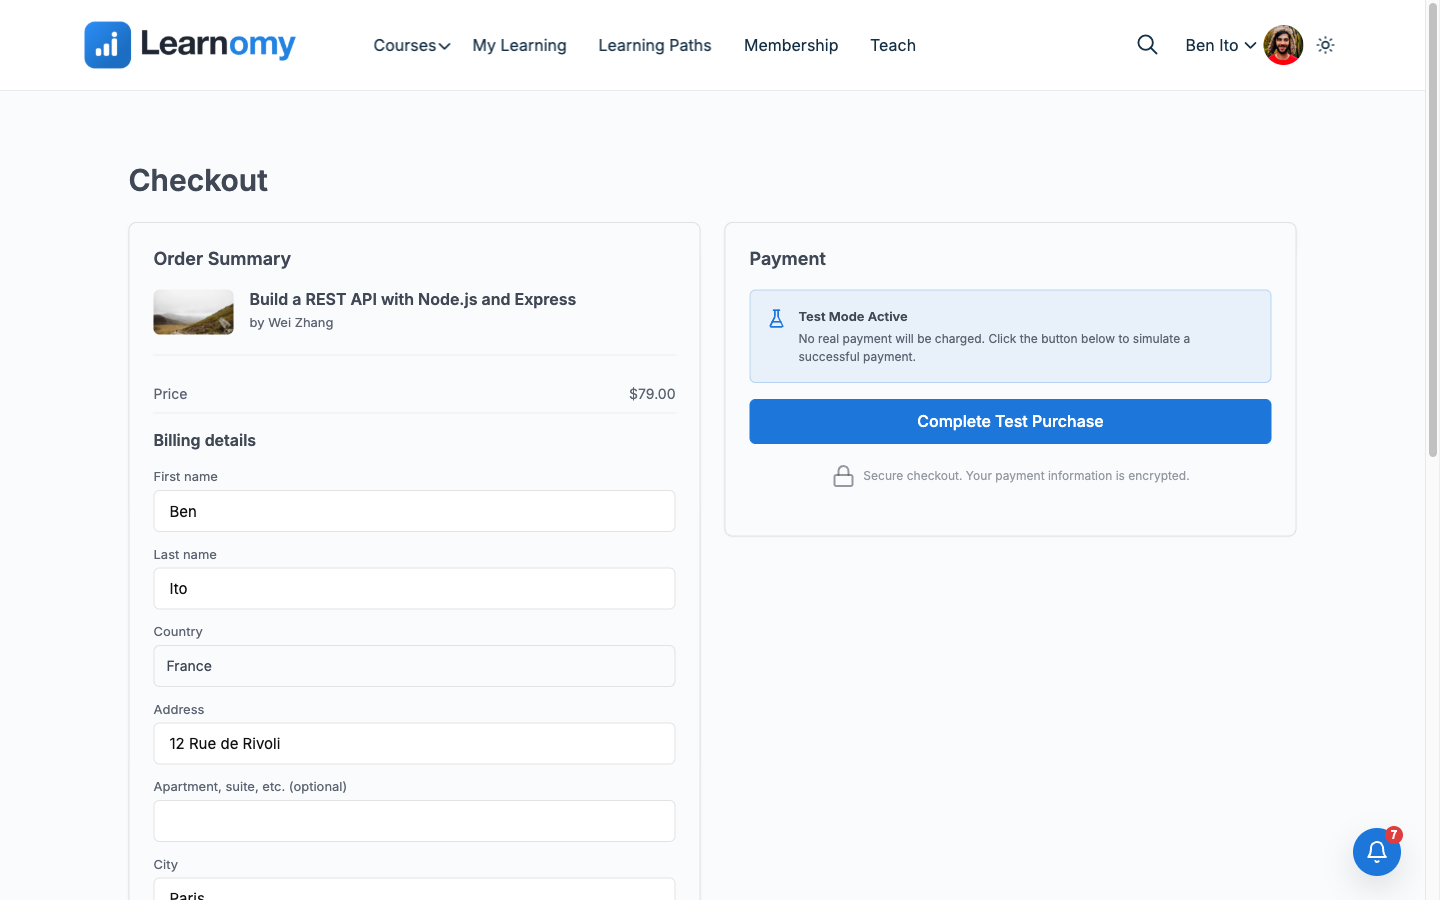
Student checkout page with Test Payment selected
Phase 4 - Go live
Go back to LMS Settings > Settings > Payments and switch Stripe (and PayPal, if you enabled it) from Test mode to Live, using your live API keys. Turn off Enable Test Gateway so real students only see real payment methods at checkout.
Add the catalog to any page with the Course Catalog block in the block editor, or the
[learnomy_course_grid]shortcode if your theme's page builder does not support blocks. A single course can go on its own landing page the same way with[learnomy_course]. Learnomy's front-end pages are ordinary WordPress blocks and shortcodes, so they sit inside whatever page builder or theme you already use.
Verify it works
Log in as a student who has not bought the course. Open the course page and confirm the price and Buy Now button show, then apply a coupon code if the course has one and confirm the discounted price appears before you check out.
On the checkout page, confirm Test Payment is selected and click Complete Test Purchase. You land on a "Thank you for your purchase" page with an order ID, and the course now shows Enrolled with a 0% progress bar.
Open each lesson from the course page and mark it complete, then open the final quiz, answer every question, and submit. Once every auto-graded question is scored (and any essay or short-answer question a real instructor grades manually) at or above the quiz's passing score, the enrollment status flips to completed and a certificate is issued immediately: no separate "generate certificate" step exists.
Confirm the certificate at My Certificates in the student's account. It shows the course title, the issue date, and a Verify action that opens the public verification page anyone can check, even without an account.
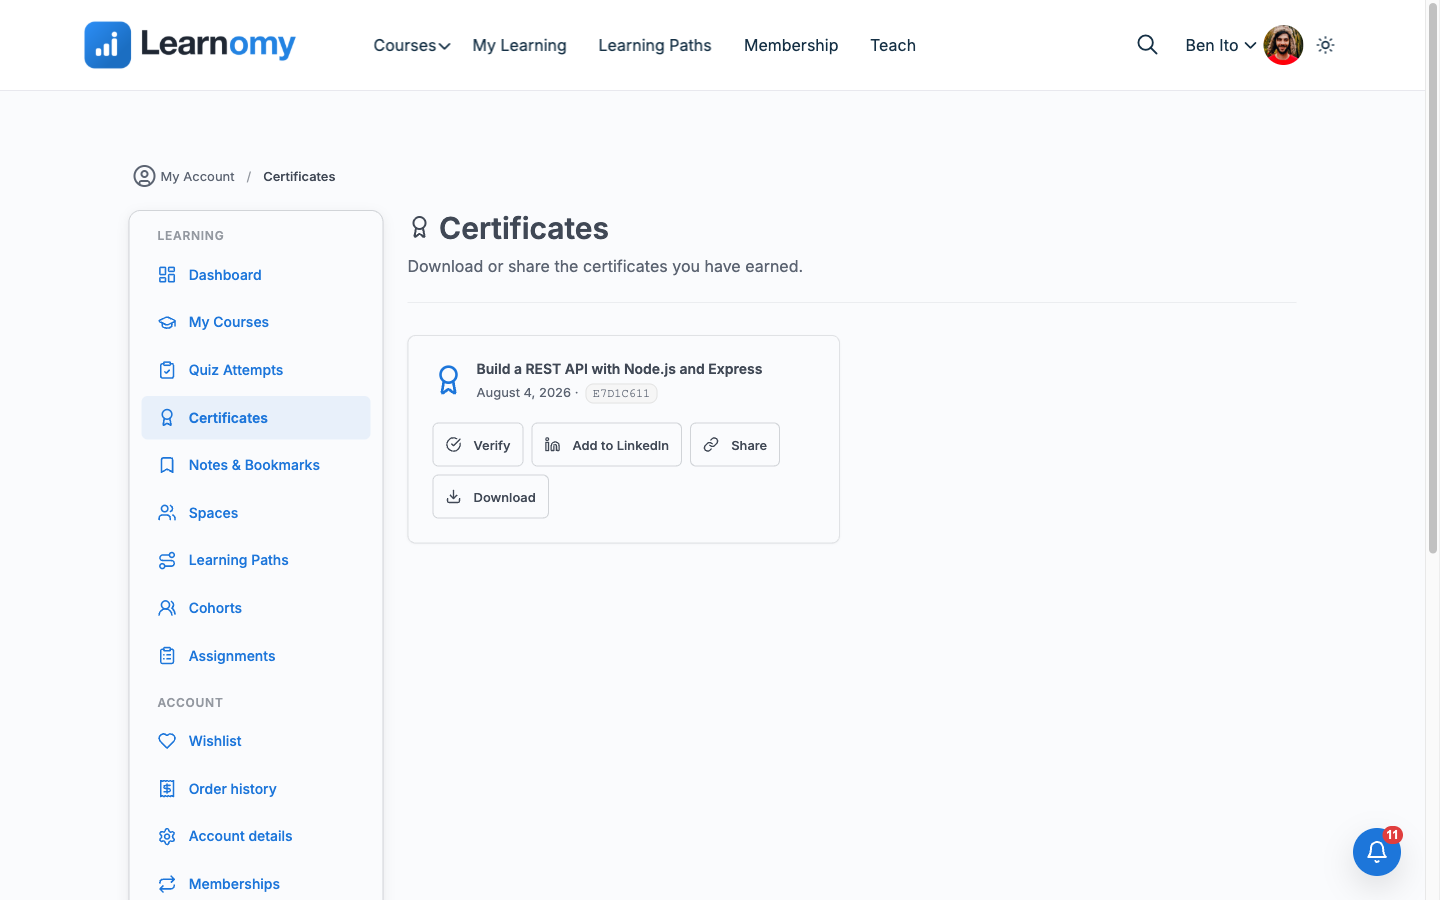
Issued certificate on the student's My Certificates page
On the model site this was exercised end to end as a test student
against "Build a REST API with Node.js and Express" ($79, one-time,
instructor Wei Zhang): coupon LAUNCHWEEK25 (25% off, restricted to that
course) applied at checkout, the Test gateway recorded order #1395,
completing all 7 lessons and the final quiz produced a passing score once
the essay question was graded, and certificate E7D1C611 (first eight
characters of its ID) issued immediately and is live at
/account/certificates/ with a working Verify link.
Keep reading
Build this on your own site
Everything above runs on your WordPress server. Start with the free plugin; add Pro when a step here needs it.