Use case walkthrough
Free & ProRun a certification body with Learnomy
You issue a credential that has to stand up to scrutiny after the exam is over. An employer, a licensing board, or a client will eventually check whether the certificate is real, so the exam has to be defensible, the completion rule has to be unambiguous, and the credential has to be verifiable by someone who has never logged into your site. You may also need to reuse compliance content authored outside Learnomy rather than rebuild it from scratch.
What you'll use
Sectioned, timed quizzes
Building a Quiz →Quiz Modes (Graded/Practice/Survey)
Quiz Modes →Quiz Proctoring (tab-switch tracking)
Quiz Proctoring →Exam Integrity Report
Exam Integrity Report →Question Map and Flag for Review
Question Map and Flag for Review →Quiz attempt limits and retake grants
Managing Students →Certificate Templates and Designer
Certificate Templates →Issuing and Verifying Certificates
Issuing and Verifying Certificates →SCORM Packages
SCORM Packages →Open Badges 3.0
Open Badges →Credly Integration
Credly Integration →Certificate Hash Verification
Certificate Hash Verification →The walkthrough
Phase 1 - Build a sectioned, timed, proctored exam
Go to Learnomy > Quizzes > Add New and set the Mode. Learnomy runs every quiz in one of three modes:
Your options here:
- Graded - scored on submit, produces a pass/fail result against a passing score, and gates course completion when the course requires it.
- Practice - auto-scored so the student sees a result, but never blocks completion. A low-stakes self-check.
- Survey - collects answers with no score and no pass/fail.
A certification exam is always Graded. Set the Passing score as a percentage; the model site's exam uses 70%.
Group the question bank into sections and turn on the Sectioned display template, a time limit, and linear section navigation so the candidate cannot skip ahead. Set an Attempt limit to control how many tries a candidate gets before you have to grant one manually. On the model site, "Aurora Certified Analyst Exam" runs three timed sections across 24 questions in two subject areas, a 90-minute limit, and an attempt limit of
- See Building a Quiz.
Within an attempt, the Question Map and Flag for Review panel is on automatically for any quiz using free navigation and the focused display template - candidates get a clickable map of every question, can flag ones to revisit, and see a pre-submit summary of anything left unanswered or flagged. There is nothing to configure. See Question Map and Flag for Review.
Go to LMS Settings > Settings > Quiz and turn on Track Tab Switches. This is Learnomy's built-in proctoring: no webcam and no third-party service required.
Your options here:
- Track Tab Switches off - no honest-effort signal is recorded at all. Fine for low-stakes practice quizzes, wrong for a credentialing exam.
- Track Tab Switches on, Auto-submit at 0 - every tab switch is recorded and shown to the grader, but the candidate is only warned, not cut off.
- Track Tab Switches on, Auto-submit at N - the same recording, plus the attempt submits itself automatically once the candidate switches away more than N times.
A certification exam should always turn tracking on. Whether you also auto-submit is a judgment call: auto-submit stops a candidate from stepping away to search for answers, but it also submits a legitimate candidate who alt-tabs to check a browser notification. The model site turns tracking on without an auto-submit limit, so every switch is recorded and flagged for the grader's judgment rather than ending the exam automatically. This is a site-wide setting, not a per-quiz one. See Quiz Proctoring.
Phase 2 - Decide what proves completion
Learnomy has two layers of completion rule, and a certification body needs both set correctly. The first is per-lesson, on the lesson editor's Completion rule field:
Your options here:
- Manual - the student clicks Mark Complete themselves; no automatic check.
- Auto: time on page - unlocks once the student has spent a minimum amount of time on the lesson.
- Auto: video watched - the button unlocks once the student has watched the lesson's video to the end.
- Auto: scroll to end - unlocks once the student scrolls a text lesson to the bottom.
- Auto: quiz pass - unlocks once the student passes the lesson's embedded quiz.
- Auto: SCORM / standards package reports complete - unlocks only once an uploaded SCORM package reports a completing status for that student (Pro; see Phase 3).
- All of the above (combined) - every applicable rule must be satisfied.
Pick Manual for lessons that are just reading (an exam-day checklist, a format overview). Pick Auto: time on page for a dense reading lesson where you want a minimum-time floor as an honest proxy for actually reading it, rather than trusting a click. Pick Auto: quiz pass for a lesson that ends in a short embedded knowledge check. Pick Auto: SCORM / standards package reports complete for any lesson built from an externally authored compliance module, so "complete" is never something the student can just click through.
The second layer is course-level, on the course editor's Completion & Certificate section, under Completion Requirement:
Your options here:
- All Lessons Completed - every lesson (by its own rule above) must be complete. The course has no standalone final exam gate of its own.
- Lessons + Final Quiz - lessons must be complete, and the student must also pass a designated final quiz.
- Percentage of Content - a threshold percentage of lessons must be complete, useful when some lessons are optional.
- Manual Completion - an instructor marks the student complete by hand.
For a certification body, Lessons + Final Quiz is the right choice whenever the credential's real bar is a proctored exam score rather than just working through the material: pick the Graded exam from Phase 1 as the final quiz, and nobody earns the credential without clearing the passing score. Reach for All Lessons Completed only when the exam itself already sits inside the lesson flow as a required, auto-graded step, so lesson completion and exam completion are the same event.
Grade defensibly. Open Learnomy > Grading and select a submitted attempt. The header shows the Exam Integrity Report: the tab-switch count, the submission IP address, and a late-submission signal if the attempt came in after the time limit. A flagged tab-switch count (3 or more by default) shows a warning shield instead of a check, with a reminder that the signal is advisory only, not proof of misconduct - it is context for your review, not a verdict.
On the model site, Amara Nwosu's second attempt at "Aurora Certified Analyst Exam" is flagged: 5 tab switches, submitted from IP
203.0.113.126. She failed both of her allowed attempts (50%, then 66.7%, against a 70% passing score).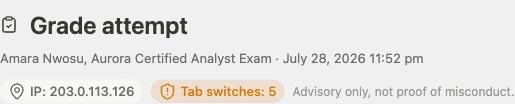
Grade attempt header showing Amara Nwosu, IP, flagged tab switches, and advisory note When a candidate exhausts their attempts and you decide a retake is warranted (a documented technical issue, an appeal you granted), open their profile at Learnomy > Students and find Quiz attempt limits. Click Grant 1 attempt on the exam row. This affects only that student and that quiz - their existing scores, progress, and any certificate already issued for other courses are untouched, and the action is reversible with Take back 1 attempt. On the model site, Amara already has a granted extra attempt from an earlier review of her flagged submission, still unused. See Managing Students.
Phase 3 - Reuse externally authored content with SCORM (Pro)
If part of your certification material was built outside Learnomy - in Articulate Storyline, Adobe Captivate, iSpring, or a similar authoring tool - you do not need to rebuild it as native lessons. Go to LMS Settings > Modules and confirm SCORM is enabled (Integrations category; it is off by default on a fresh install). Then open the lesson that should hold the package, set its Content Type to SCORM, and upload the package's
.zip. Learnomy validates it, reads theimsmanifest.xml, and shows a summary card with the detected version (SCORM 1.2 or 2004), the launch file, and the number of SCOs.Set that lesson's Completion rule to Auto: SCORM / standards package reports complete (the SCORM-gate option from Phase 2). This is the compliance-grade choice: the Mark Complete button stays disabled until the package itself reports a completing status, so a student cannot click through content they never actually finished.
The Lesson Settings card is where you set the content type and see the uploaded package's own summary once it validates:
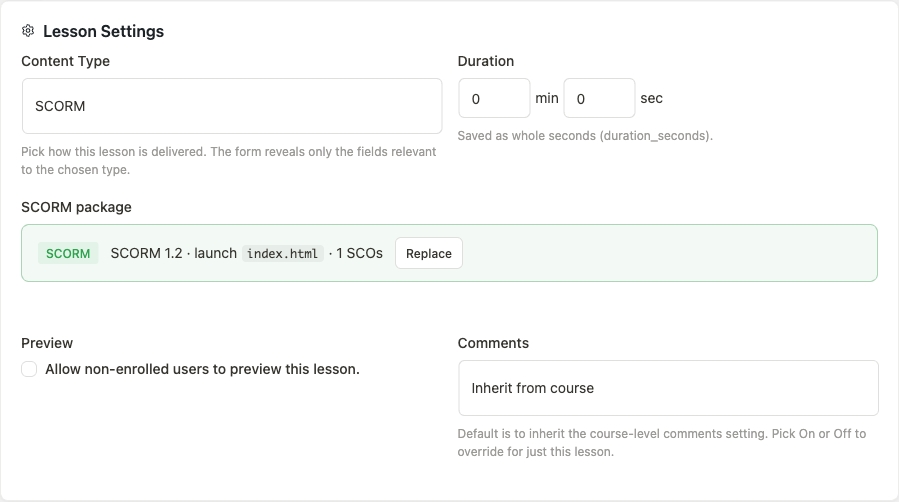
Lesson Settings card with SCORM content type and package summary The gate itself lives lower on the same lesson editor page, in the separate Completion Rules card, where the SCORM option shows selected:
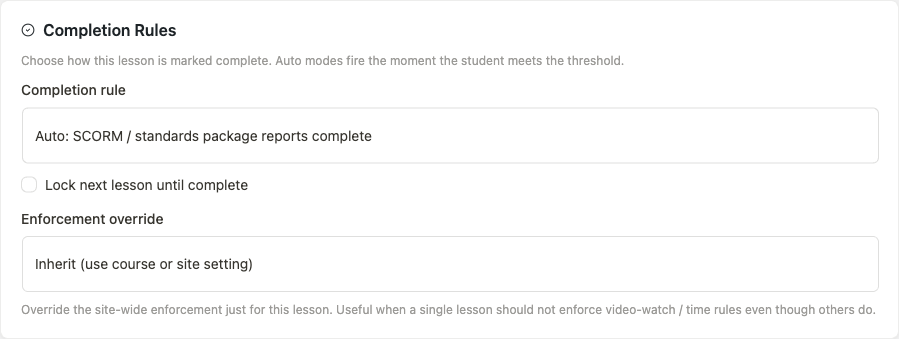
Completion Rules card with Auto: SCORM / standards package reports complete selected We built a minimal SCORM 1.2 package for this capture and imported it live through this exact flow to confirm the gate end to end, since no fixture package ships with the model site's seed data. Uploaded, the package summary read "SCORM 1.2 - launch
index.html- 1 SCOs" - the import worked on the first try with no errors. As a student, the lesson loaded the package in an iframe with Mark lesson complete disabled and a "Finish the course content until it reports completion" requirement showing underneath it: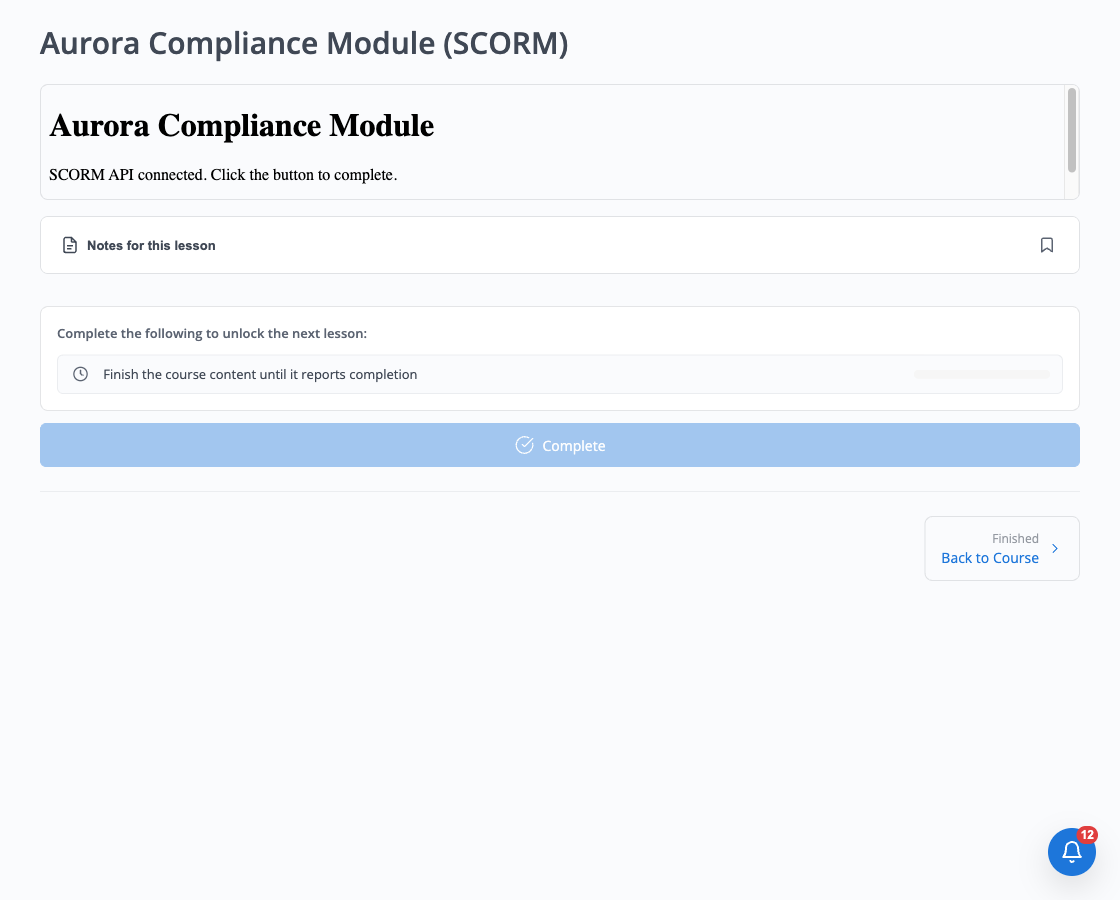
SCORM lesson player with disabled Mark lesson complete button Completing the package's own action inside the iframe reported
cmi.core.lesson_status = completedback to Learnomy through the SCORM API, and the lesson - and, since it was the course's only ungated lesson, the whole course - flipped to complete immediately, with no page reload and no separate "sync progress" step. The gate holds and releases exactly as documented. See SCORM Packages.
Phase 4 - Design the certificate and choose a credential form
Open Learnomy > Certificates > Design New Template, or edit one of the four curated templates every install ships with (two course-completion styles, two quiz-completion styles). Add a QR Code element from the Add Elements panel - it encodes the certificate's public verification URL, so a printed or downloaded copy is self-verifying without the website open. The model site's exam uses the curated Course Completion - Elegant template, which already has a QR code placed in the bottom-right corner.
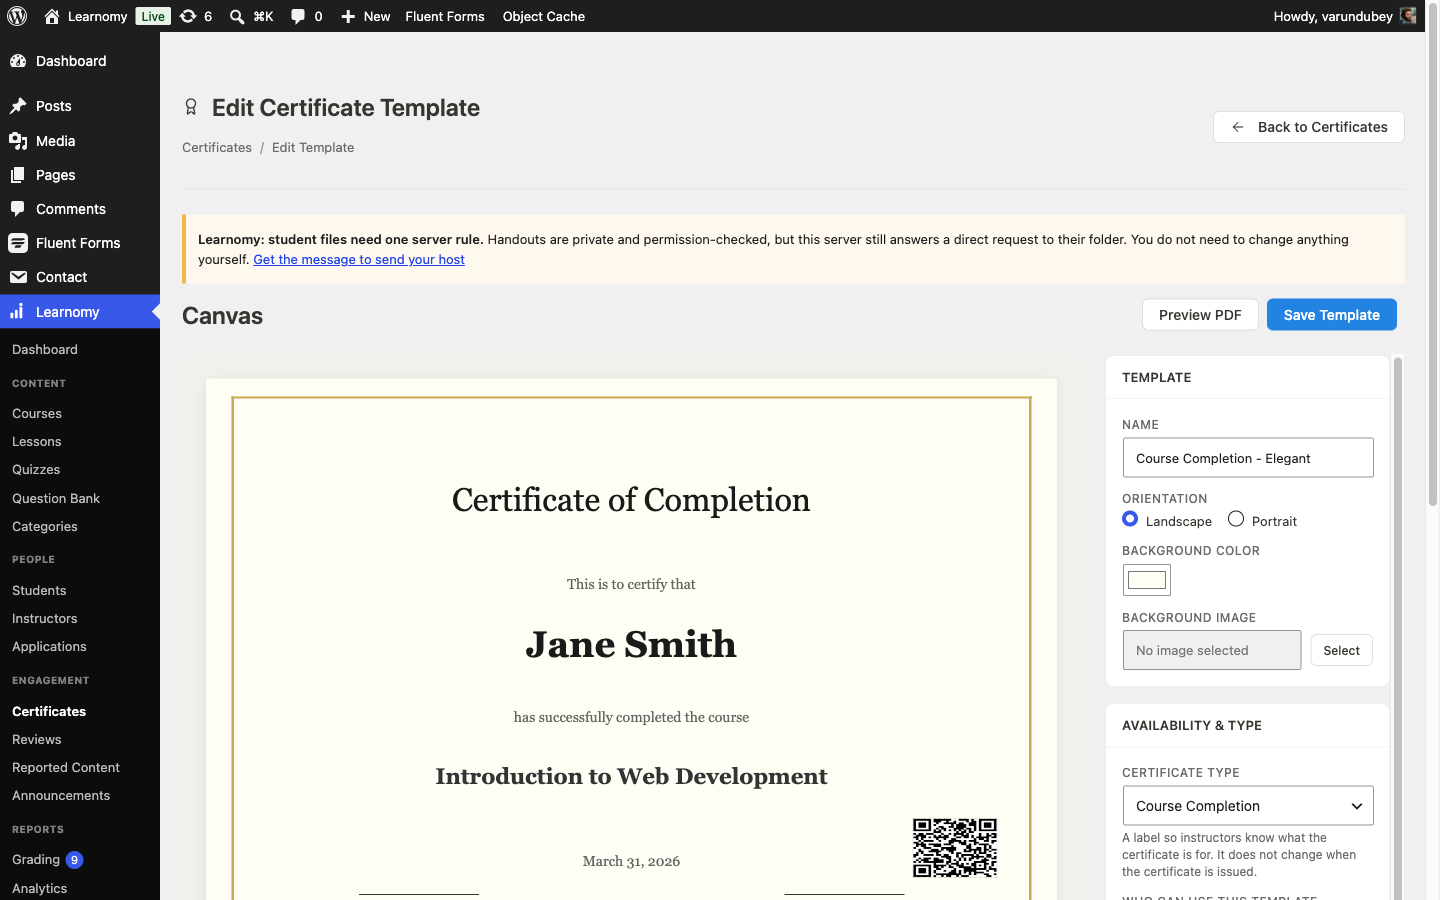
Certificate Designer with the Course Completion - Elegant template, including a QR code element Decide what form the credential takes. Learnomy supports three, and they stack rather than compete:
Your options here:
- PDF certificate - the free plugin's built-in format. Automatic, signed, downloadable, and printable. Every course that awards a certificate gets one; no extra setup beyond assigning a template.
- Open Badges 3.0 (Pro) - a W3C-standard
OpenBadgeCredentialassertion, generated automatically from the same certificate data, for import into an external badge wallet such as Badgr. There is no settings screen for this feature - it has no per-certificate configuration to turn on or tune. The moment a certificate is issued while Certificates Pro is active, its badge assertion exists at a public URL, and a Download Open Badge (JSON) button appears on that certificate's verification page. That button is the feature's only user-facing surface. - Credly push (Pro) - pushes a digital badge to the student's Credly account the moment a certificate is issued, and Credly emails them to accept it. Requires a Credly account, an API token, an organization ID, and (per course) a Credly badge template ID, configured at LMS Settings > Credly.
A certification body typically wants all three: the PDF as the document the candidate can print and frame, Open Badges as the portable, machine-verifiable credential for LinkedIn and badge wallets, and Credly on top of that if your industry's employers already expect to see credentials show up there. The PDF costs nothing extra; Open Badges costs nothing extra either once Certificates Pro is active, since it has no setup step; Credly is the only one of the three that needs you to go connect an external account.

Add to LinkedIn and Download Open Badge (JSON) links on the certificate verification page If you choose Credly, go to LMS Settings > Credly, paste in your API Token and Organization ID from your Credly account, turn on Enable Credly and Auto-push Badges, then Save Settings and Test Connection. The model site has not connected a Credly account, so the panel below shows the real, honest unconfigured state every new install starts from - empty fields and a "Connect Credly to start issuing badges" prompt - rather than a populated example. Once connected, map each course to a Credly badge template from the course editor's Credly Badge field. See Credly Integration.
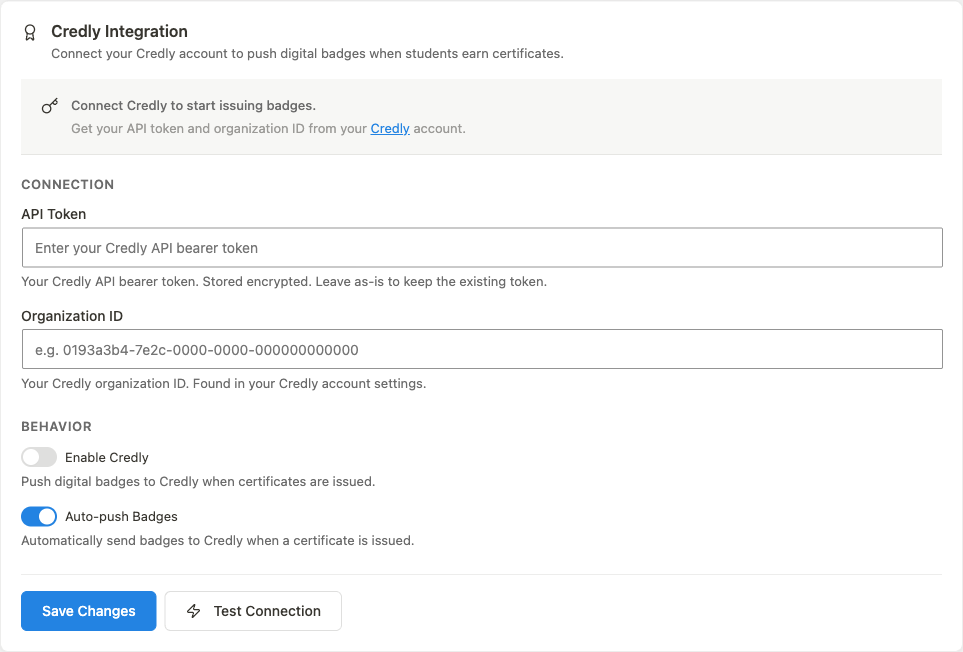
Credly Integration settings card, unconfigured state One more credential-integrity feature is worth knowing about even though this guide does not turn it on: Certificate Hash Verification (Pro) records a SHA-256 fingerprint of each certificate's fixed fields at issue time, so a later check can confirm the data has not changed. Read this honestly before you promise it to a customer: it is not a public blockchain. The fingerprint is written to a local, tamper-evident registry on your own site (capped at 500 entries, oldest evicted first), not submitted anywhere external. A future release may add public timestamping through OpenTimestamps; today it does not. Some internal names still say "blockchain" for backward compatibility, but sell it as what it is: a local hash registry, not blockchain anchoring. See Certificate Hash Verification.
Phase 5 - Make every credential independently verifiable
Decide how an employer or licensing board checks a credential. Every certificate already gets a public URL at
/verify/<uuid>/the moment it is issued - there is no separate "publish" step.Your options here:
- Share the /verify/ link directly - copy it from the student's My Certificates page or the admin Certificates list and send it, or let the student share it themselves.
- Scan the QR code on the certificate - the QR element on the PDF
points at the same
/verify/<uuid>/URL, so anyone with the printed or downloaded certificate in hand can check it without typing anything. - Both - the model site's certificate template includes a QR code and every certificate still has its own shareable link; there is no reason to pick only one, since the QR code is just a scanning shortcut to the exact same page.
A certification body should always keep both live: the link for a digital application form, the QR code for a physical printout.
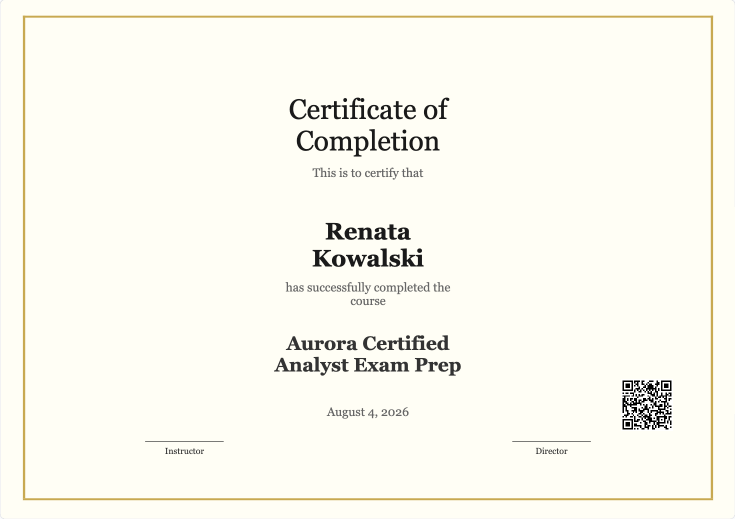
Rendered certificate card with QR code and Download/Print buttons Open a certificate's verification page and read the result block: a Certificate Verified status, the recipient name, the course title, the issue date, the credential ID, and (if you added one) a second QR code. No login is required to view it.
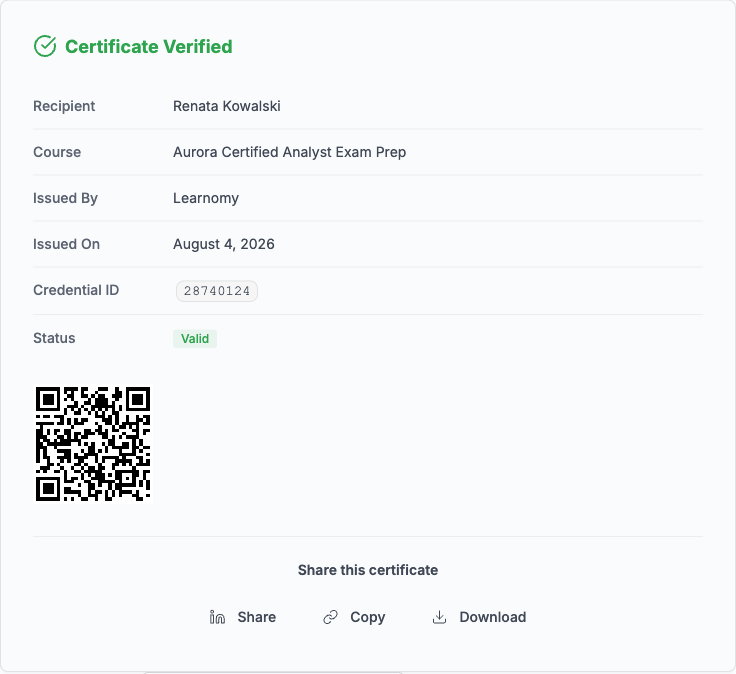
Certificate Verified result block with recipient, course, credential ID, status, and QR
Verify it works
- Open
/verify/28740124-a231-4198-982b-91971106f23b/(no login needed). The page returns the certificate for Renata Kowalski, "Aurora Certified Analyst Exam Prep," issued August 4, 2026, credential ID28740124, status Valid - the rendered certificate, its QR code, and the verification result all load correctly for a real, currently-active certificate. - Open
/verify/00000000-0000-0000-0000-000000000000/(an unissued UUID). The page returns an HTTP 404 and shows Certificate Not Found: "No certificate matches this ID. Double-check the URL and try again." A fabricated or guessed credential ID cannot be made to look valid.
Keep reading
Build this on your own site
Everything above runs on your WordPress server. Start with the free plugin; add Pro when a step here needs it.