
Use case walkthrough
Free plugin onlyRun a global academy with Learnomy
Your buyers are not sitting behind a US credit card. Some pay from Germany or France by bank debit, some from Brazil or Mexico with a cash voucher, some from the UK or Australia with an ordinary card, and some read the checkout page in their own language before they trust it enough to pay. A single "enter your card number" form quietly turns away every buyer whose bank does not offer one, and a catalog only in English does the same to a browser set to German. None of this needs Learnomy Pro: delayed payment methods, a stored billing address, a flat tax rate, translation-ready UI strings, and per-course SEO overrides are all in Free.
What you'll use
Stripe checkout, including delayed bank methods
Payment Gateways →WooCommerce checkout (alternative route)
Payment Gateways →Billing address on account, frozen per order
Checkout and Purchase Flow →Flat tax rate
Tax (Flat Rate) →Transactions and clearance states
Transactions →Translation-ready plugin strings
Per-course SEO
Course SEO and Sharing →The walkthrough
Phase 1 - Pick a checkout route
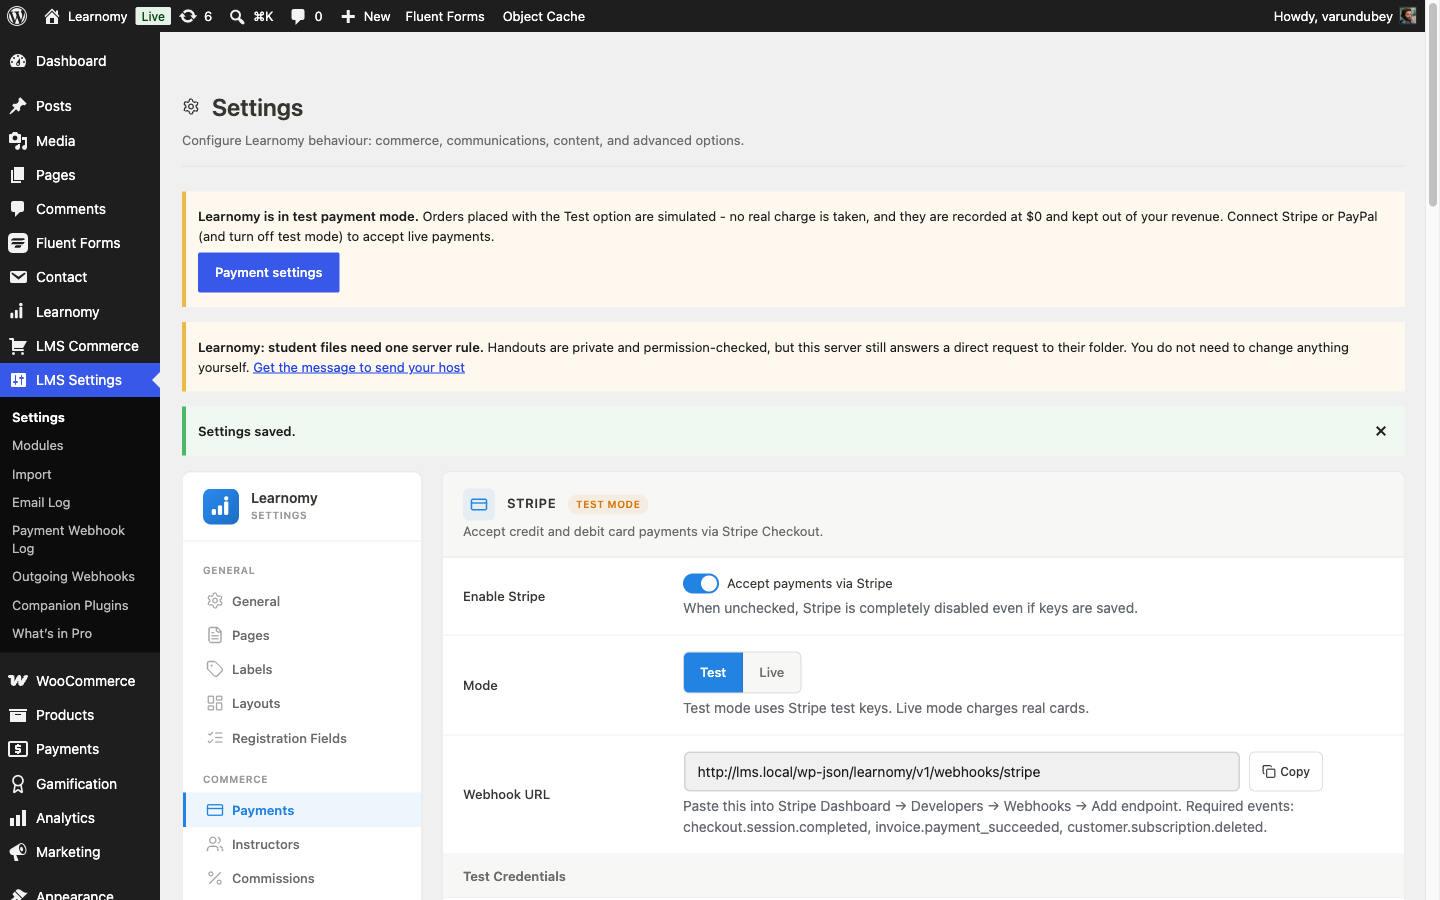
Go to LMS Settings > Payments. Learnomy offers four gateways, and more than one can be enabled at once:
Your options here:
- Test - a synchronous in-memory gateway for building and QA. No real money, no setup. Turn it off before you launch.
- Stripe - on-page checkout with Stripe's Payment Element. Alongside cards, Stripe supports a set of delayed bank and voucher methods per region: SEPA Direct Debit and Bacs for European and UK bank accounts, BECS for Australia, boleto for Brazil, OXXO for Mexico, and Konbini for Japan. You enable the methods you want directly in your Stripe Dashboard; nothing to configure in Learnomy beyond the webhook.
- PayPal - a second real-money option, on-page button, no delayed methods.
- WooCommerce - routes the purchase through the WooCommerce cart and checkout instead of Learnomy's own. WooCommerce's own extensions add region-specific tax rules (EU VAT with reverse charge, US nexus tax, and so on) that Learnomy's flat rate does not attempt.
For a global academy specifically, the choice is Stripe direct against WooCommerce, and it comes down to what you need most:
- Stripe direct is the pick when the thing standing between you and a sale is the payment method itself. A buyer without a card, or unwilling to type one into an unfamiliar site, can still pay with a bank debit or a voucher, and you get there with one webhook and no separate store to run.
- WooCommerce is the pick when the thing you actually need is tax compliance and a store you already operate -- EU VAT with the reverse charge for B2B buyers, region-aware rates, and a full order and reporting system, at the cost of the delayed-method roster above (WooCommerce brings its own payment methods through its own extensions, not Stripe's).
Most global academies start with Stripe direct: it solves the more common failure mode (a buyer who can't pay at all) with almost no setup, and Learnomy's flat tax rate covers basic compliance until a WooCommerce-routed storefront is worth the extra moving parts.
Phase 2 - Collect a billing address and set your tax rate
Whichever gateway you use, the checkout page collects a billing address above the payment method: first and last name, company, country, two address lines, city, state, postcode, email, phone, and a tax registration number (one field covers a VAT ID or a GSTIN). Six fields are required -- first name, last name, country, address line 1, city, postcode -- the rest are optional.
The address belongs to the buyer, not to the order. It saves to their account, so it comes back pre-filled on their next purchase, and every order also keeps its own frozen copy taken at the moment of purchase -- editing the profile later never rewrites an old receipt. The example below is Chloe Jones checking out from Amsterdam; her address is already on file from an earlier purchase, so the form arrives filled in rather than blank.
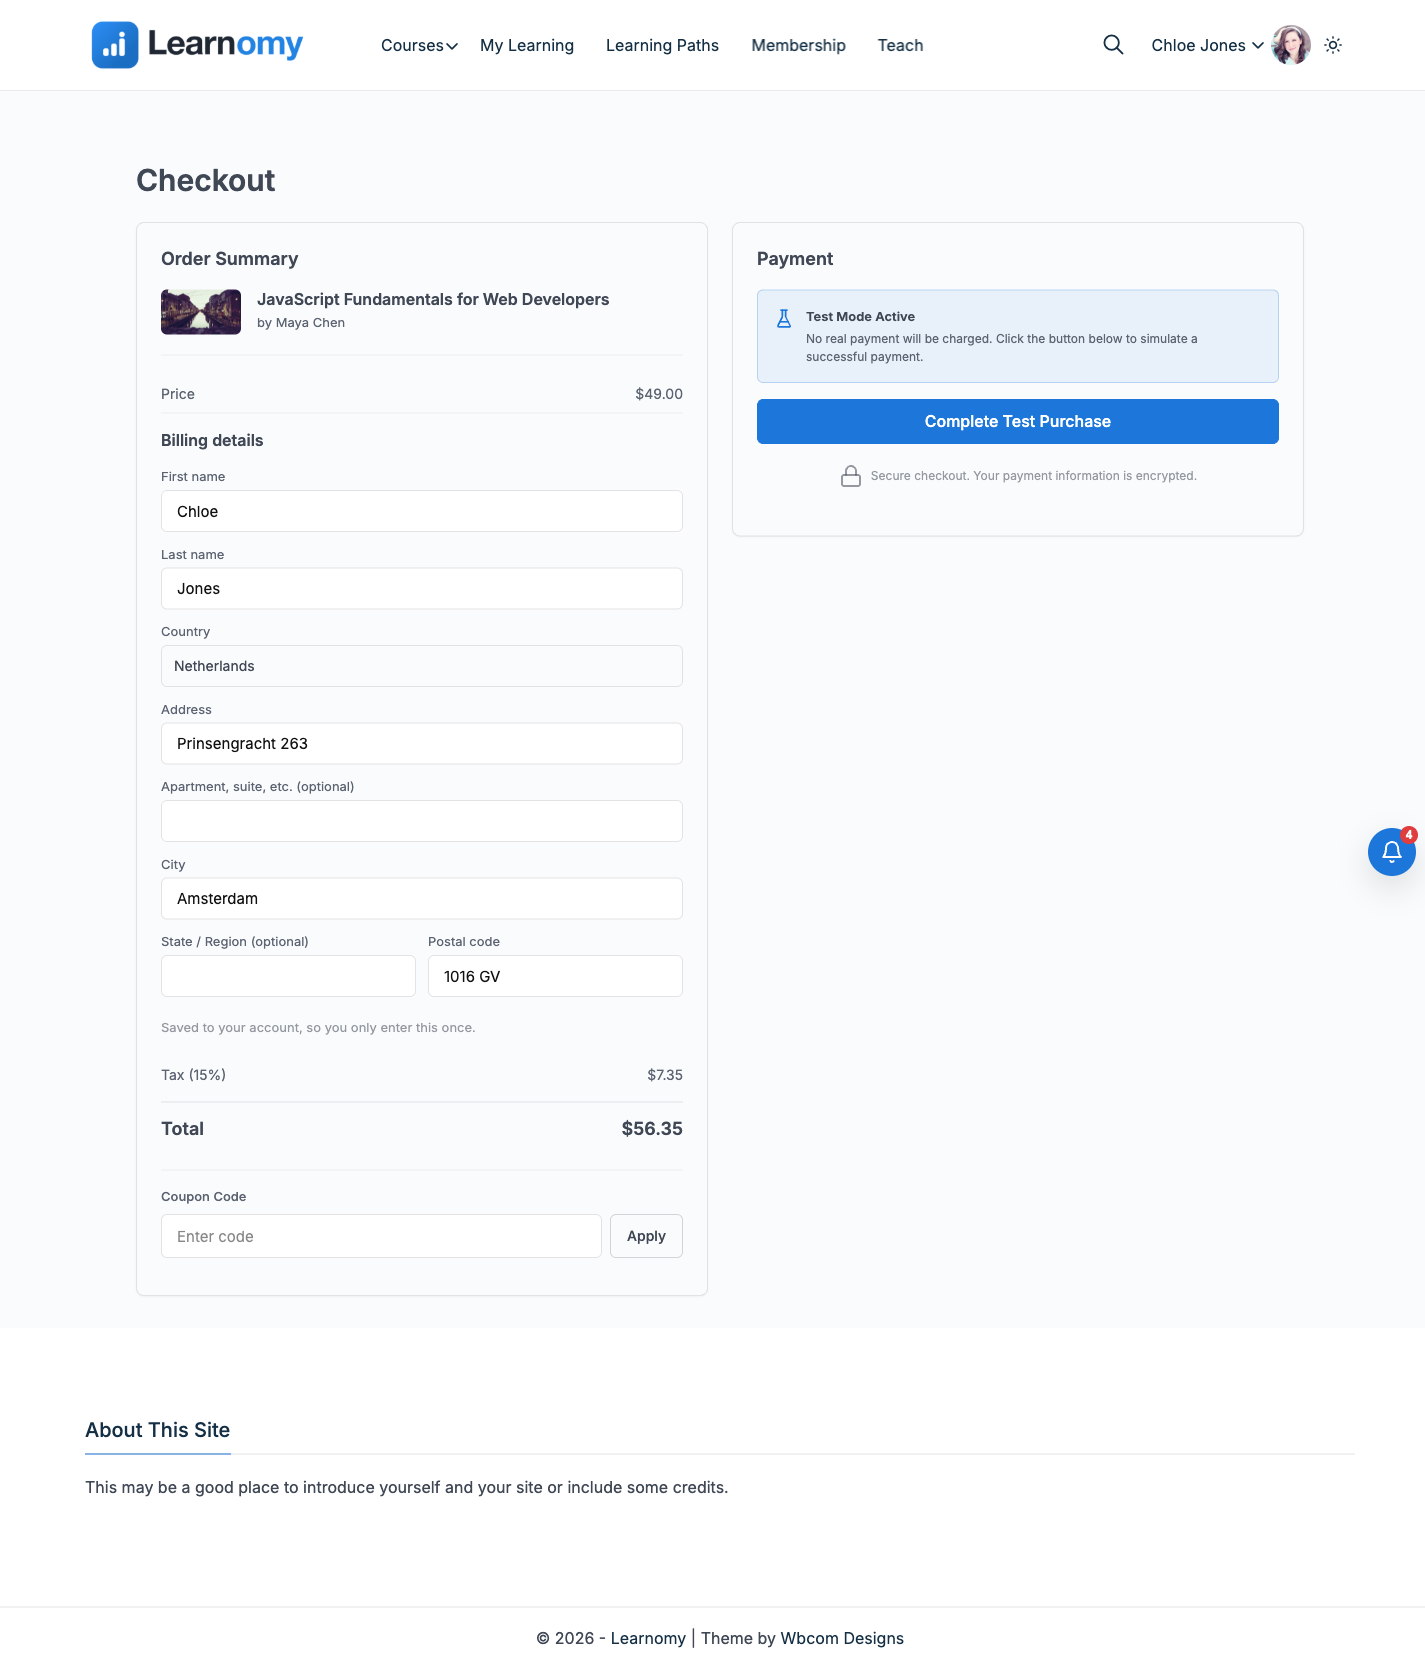
While you're on LMS Settings > Payments, open the Tax card and turn on Collect tax. Set a Tax rate and a Tax label (Tax, VAT, GST -- whatever your region calls it). This is one flat percentage applied to every paid Stripe or PayPal purchase; it is not a per-country VAT table. If your buyers span enough jurisdictions that a single rate stops being defensible, that is the signal to route through WooCommerce instead, which brings its own tax engine. See Tax (Flat Rate).
Phase 3 - Understand what happens between checkout and clearance
A card payment (or PayPal, or the test gateway) settles the moment the buyer submits, and Learnomy enrolls them immediately. A delayed method does not: a bank debit or a cash voucher tells Stripe "accepted" right away, but the money can take days to actually arrive. Learnomy tracks three states on the transaction row:
| Status | What it means | What the buyer has |
|---|---|---|
| Pending | Payment initiated, not yet confirmed by the gateway | Nothing yet -- no enrollment |
| Completed | The gateway confirmed the funds cleared | Full access, enrolled at the moment of clearance |
| Failed | The gateway reported the payment did not go through | Nothing -- no paid-looking order is left behind |
The buyer is not enrolled at checkout for a delayed method. They land on
the thank-you page in a pending state that explains their enrollment is being
set up, and the page keeps checking until the webhook resolves it one way or
the other. You don't configure this; it's how Stripe's asynchronous methods
work, and the one requirement on your side is that the webhook events
checkout.session.async_payment_succeeded and
checkout.session.async_payment_failed stay subscribed in your Stripe
Dashboard. Without them, a buyer who pays by SEPA is charged and never
enrolled. The "Required events" hint printed next to the webhook URL on
LMS Settings > Payments does not currently list these two events, so add
them in the Stripe Dashboard anyway rather than relying on the on-screen
list, or the same delayed-method buyers -- SEPA, boleto, OXXO, and the rest
-- are charged and never enrolled.
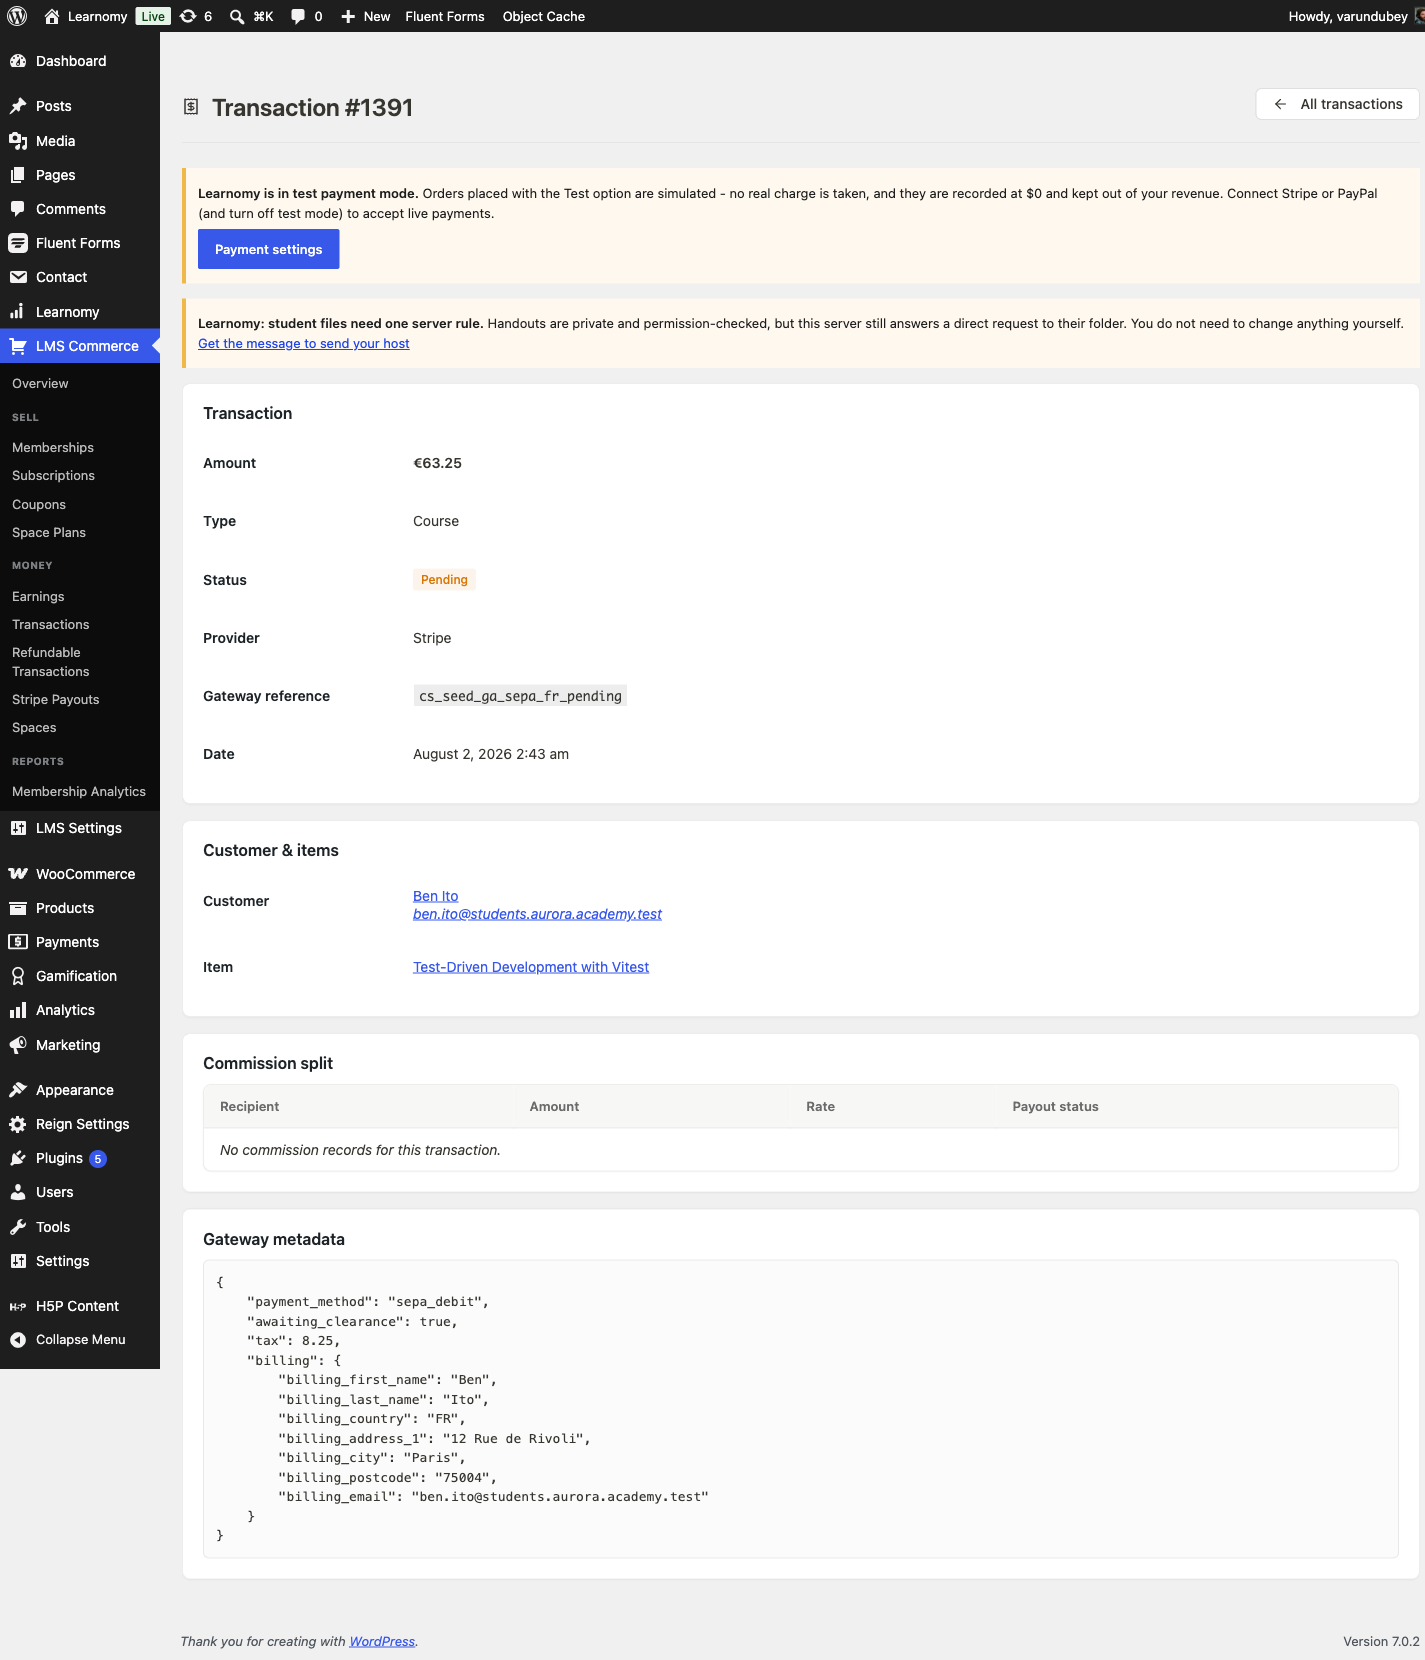
Below is transaction cs_seed_ga_sepa_fr_pending on the model site: Ben Ito
paid €63.25 for "Test-Driven Development with Vitest" by SEPA Direct Debit.
The gateway metadata shows "awaiting_clearance": true, and there is no
enrollment for Ben on this course yet.
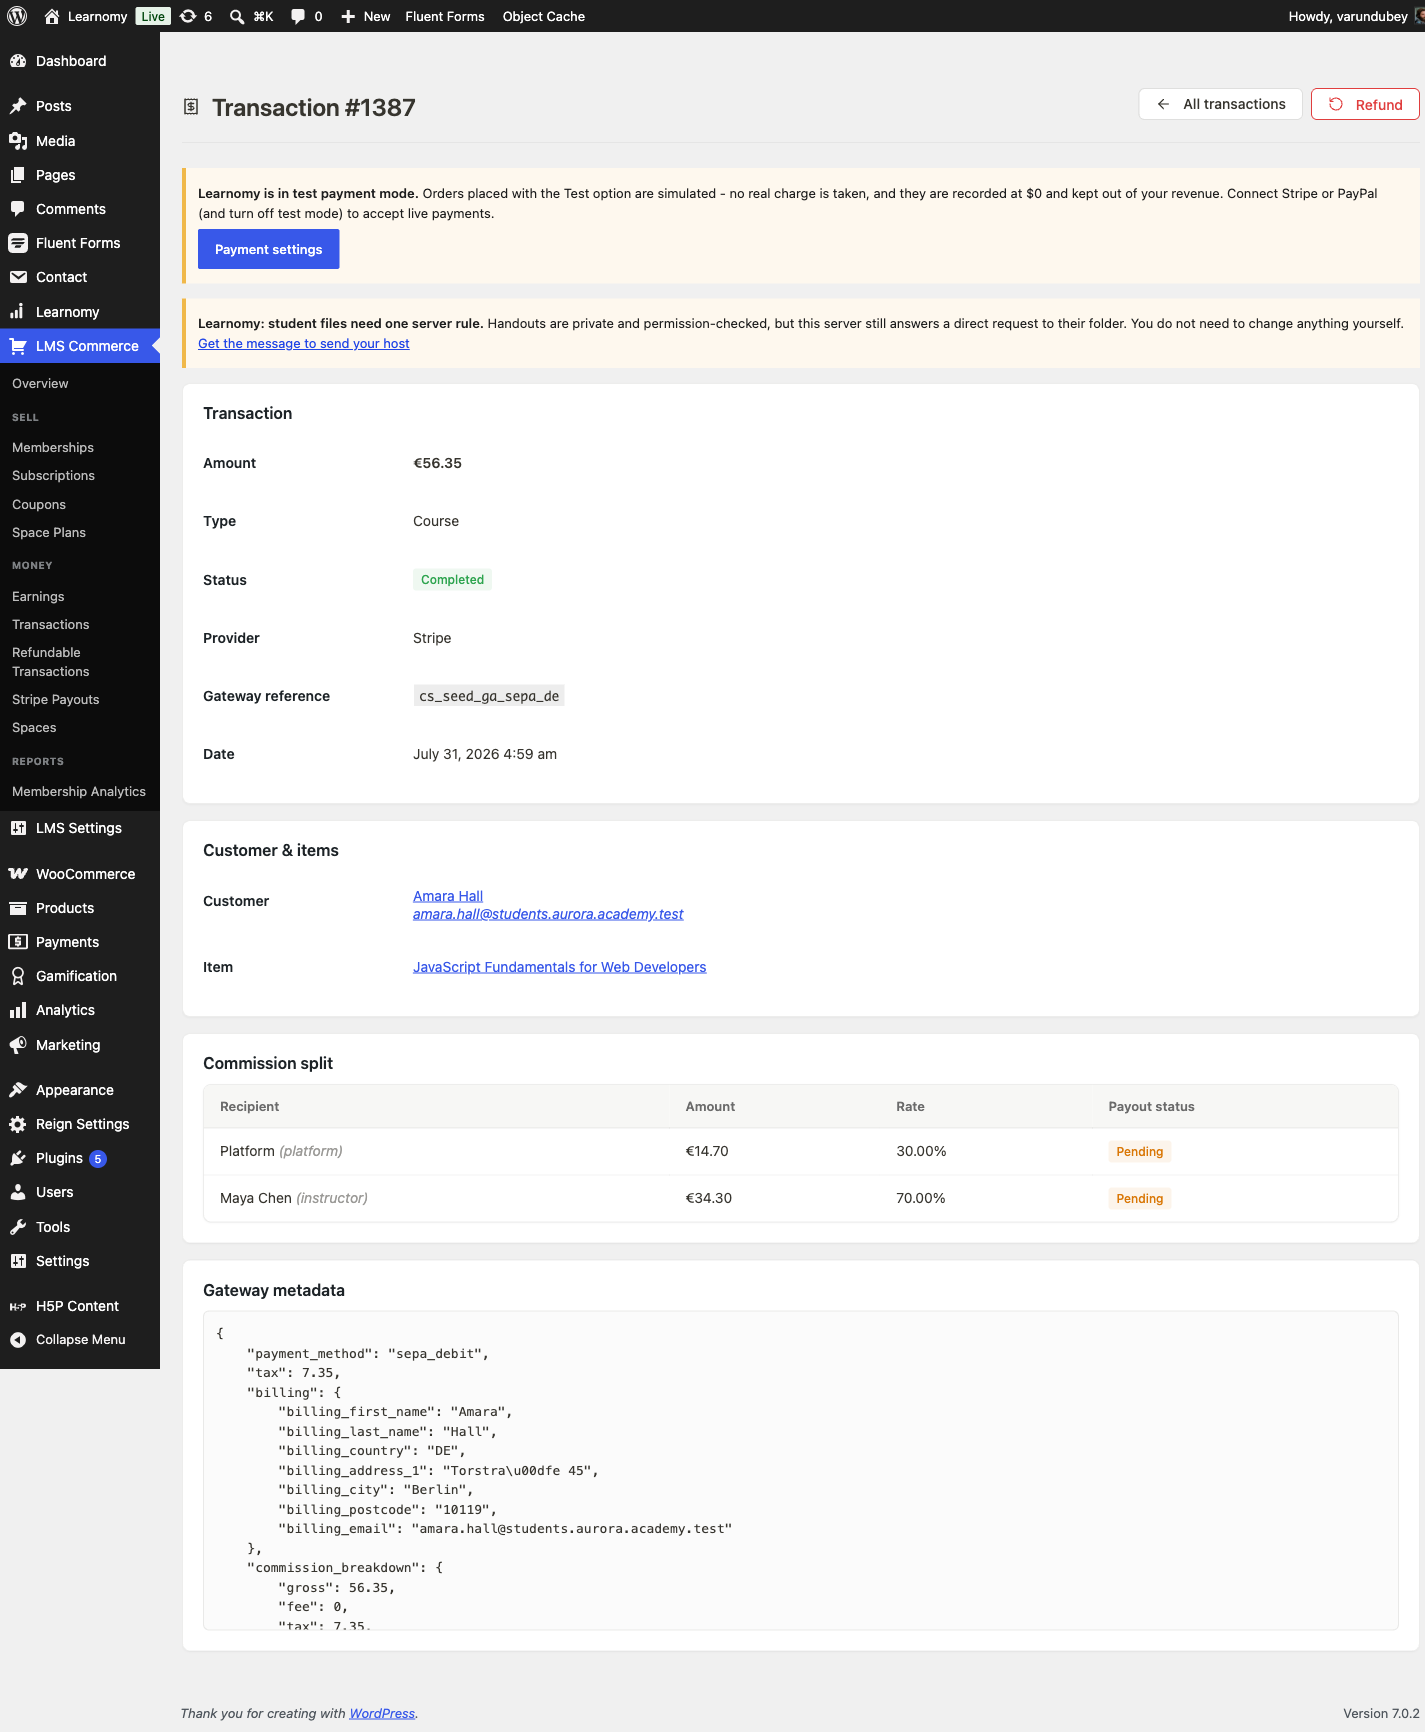
Compare that with cs_seed_ga_sepa_de, also a SEPA debit, from Amara Hall in
Berlin. Its status is Completed, the address is frozen exactly as she typed it
(Torstraße 45, Berlin), the tax is broken out, and -- because this transaction
did clear -- a commission split now exists for the platform and the instructor.
Phase 4 - Localize the interface
Go to Settings > General > Site Language in wp-admin. Learnomy ships nine translated locales in the plugin itself, ready to use the moment you pick one: German (de_DE), Spanish (es_ES), French (fr_FR), Italian (it_IT), Dutch (nl_NL), Polish (pl_PL), Brazilian Portuguese (pt_BR), Russian (ru_RU), and Swedish (sv_SE). Setting Site Language switches every plugin string -- course labels, checkout, account pages, admin screens -- to that language for everyone who visits the site, admin bar included.
Your options here:
- One Site Language for the whole install - the simplest setup. Every visitor sees the same language regardless of their own browser or account settings. This is what most single-region academies want, and it's the option demonstrated below.
- A separate install per region (a
de.subdomain or a second site) - each with its own Site Language, its own currency default, and often its own course catalog if the content itself needs translating, not just the interface chrome. Reach for this when the academy sells materially different content per market, not just the same catalog in a different language.
Learnomy does not ship a per-visitor language switcher of its own -- a visitor
picks a language by which site or subdomain they land on, not from a dropdown
on the page. A multilingual plugin can add that switcher on top; Learnomy's
.mo files work with WordPress's standard translation loading either way.
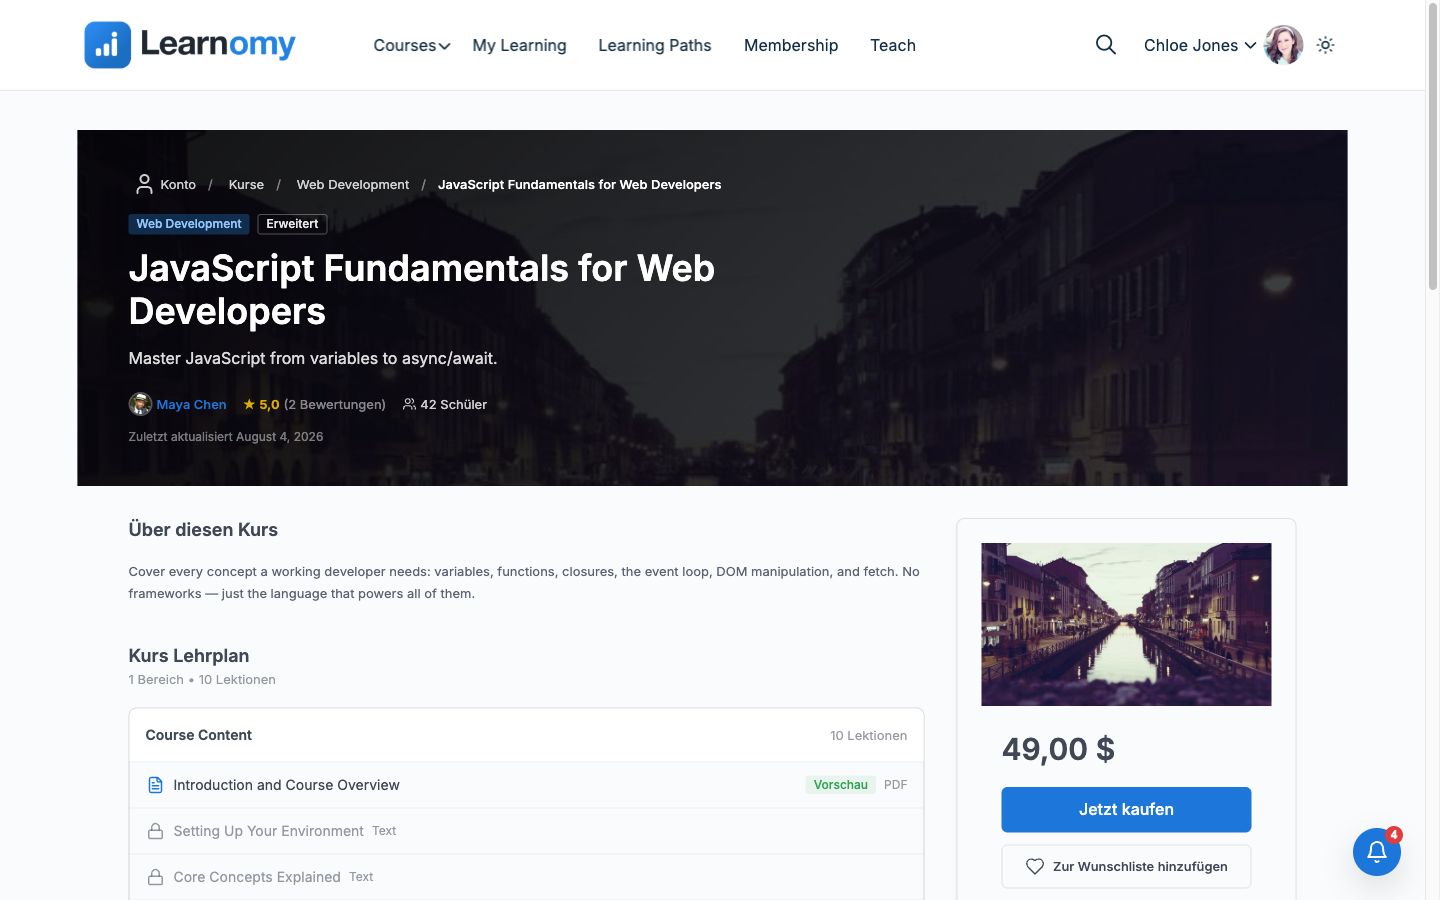
The screenshot below is the model site with Site Language set to German, viewed as a logged-in student with no admin access. "Buy Now" reads Jetzt kaufen, "Add to wishlist" reads Zur Wunschliste hinzufügen, and the curriculum labels ("Bereich" for section, "Lektionen" for lessons) are all plugin strings, not page content -- the course title and description stay in whatever language you wrote them in, since Learnomy translates its own UI, not your course content.
Phase 5 - Override SEO per course
Open a course for editing and expand Search & Sharing. Five fields -- Search title, Search description, Share image URL, Share image (media ID), and Search visibility -- default to values built from the course itself, and stay that way until you type something. This matters for a catalog serving several markets or a course whose status has changed since it was written: the example below rewrites the search snippet for a superseded course so buyers stop landing on the old version through search, without touching the course title students already bookmarked.
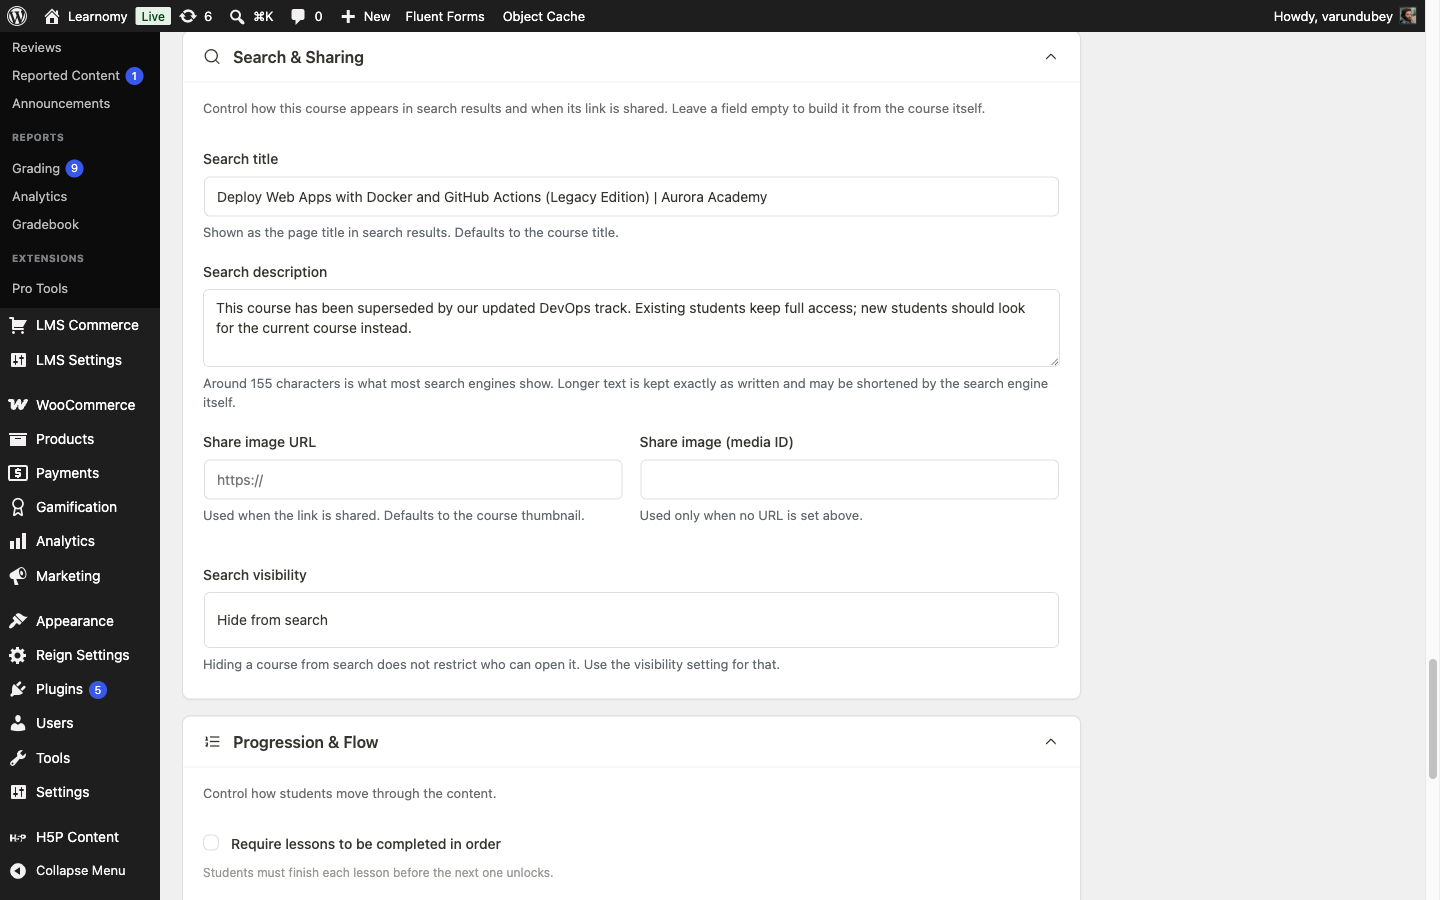
See Course SEO and Sharing for the full field reference, including how these interact with Yoast or Rank Math if you also run one.
Verify it works
- Open LMS Commerce > Transactions, search
cs_seed_ga_sepa_fr_pending, and open the result. Confirm Status reads Pending and the gateway metadata block shows"awaiting_clearance": true. No enrollment exists yet for this buyer on this course. - Search
cs_seed_ga_sepa_deand open that result. Confirm Status reads Completed, the billing address is frozen to the buyer's German details, and the commission split now shows two rows (Platform, Instructor). - Compare timestamps: the transaction's Date field reads July 31, 2026, 4:59 am -- when the SEPA debit was initiated at checkout. Open Learnomy > Students, find Amara Hall, and check her enrollment on "JavaScript Fundamentals for Web Developers": it reads August 4, 2026, 12:29 am, almost four days later. The enrollment date is the clearance date, not the checkout date, which is exactly the delayed-method behavior this guide describes: nothing was granted until the money actually landed.
Keep reading
Build this on your own site
Everything above runs on your WordPress server. Start with the free plugin; add Pro when a step here needs it.